
Baked Apples
This post may include affiliate links. Thank you for your support.
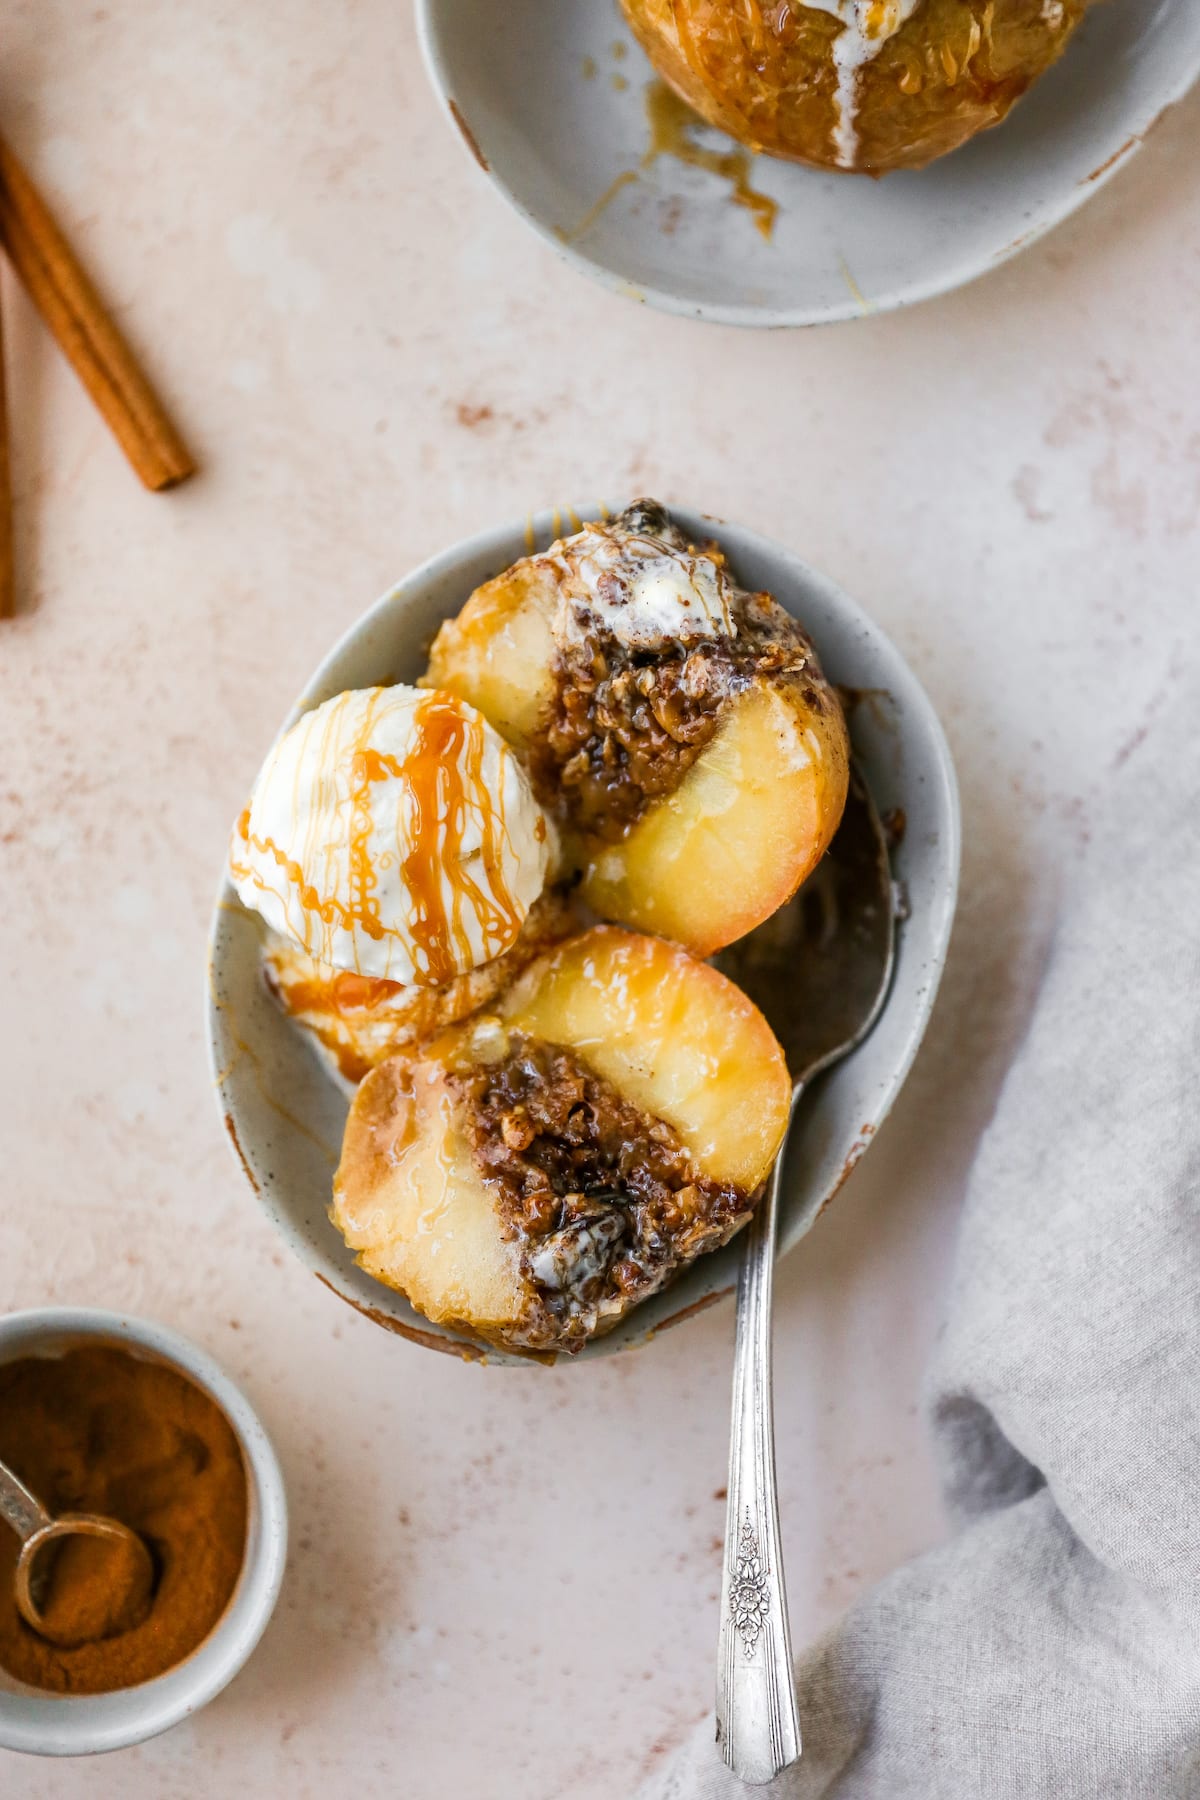
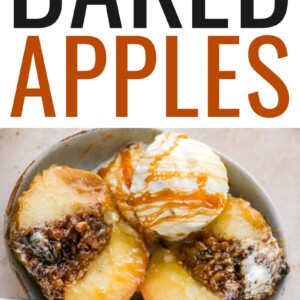
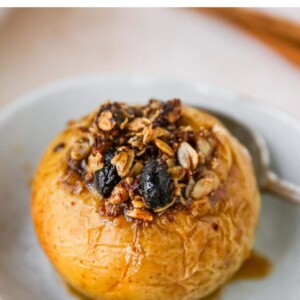
These cozy baked apples are filled with a buttery cinnamon sugar oat crumble and super easy to make. Enjoy warm with ice cream and a drizzle of date caramel sauce for the ultimate fall dessert!
I really try to enjoy every season but I love fall weather and flavors! As soon as those crisp mornings roll around, I’m craving all things apple—like my apple cinnamon baked oatmeal, healthy apple pancakes, and apple oatmeal bars. I can’t wait to take Liv to an apple orchard… something I have fond memories of growing up!
Whether you have an abundance of apples and don’t know what to do with them, or are just craving an apple treat, these baked apples are going to be your new go-to. They take a little bit of effort to get the apples cored but the end result is 100% worth it!
Table of Contents
Why You’ll Love This Recipe
- Effortless to make – First of all, baked apples are super easy to make! The hardest part is coring the apples but then you just set and forget as it bakes and gets extra delicious.
- Make-ahead friendly – You can make these apples ahead of time for a fancy dinner party or a simple family dessert.
- Perfect portions – They’re like single serving apple crisps making them perfect for portion control.
- Diet-friendly – This recipe is gluten free, dairy-free and vegan – a great option for those with gluten and dairy allergies.
Ingredients for Baked Apples
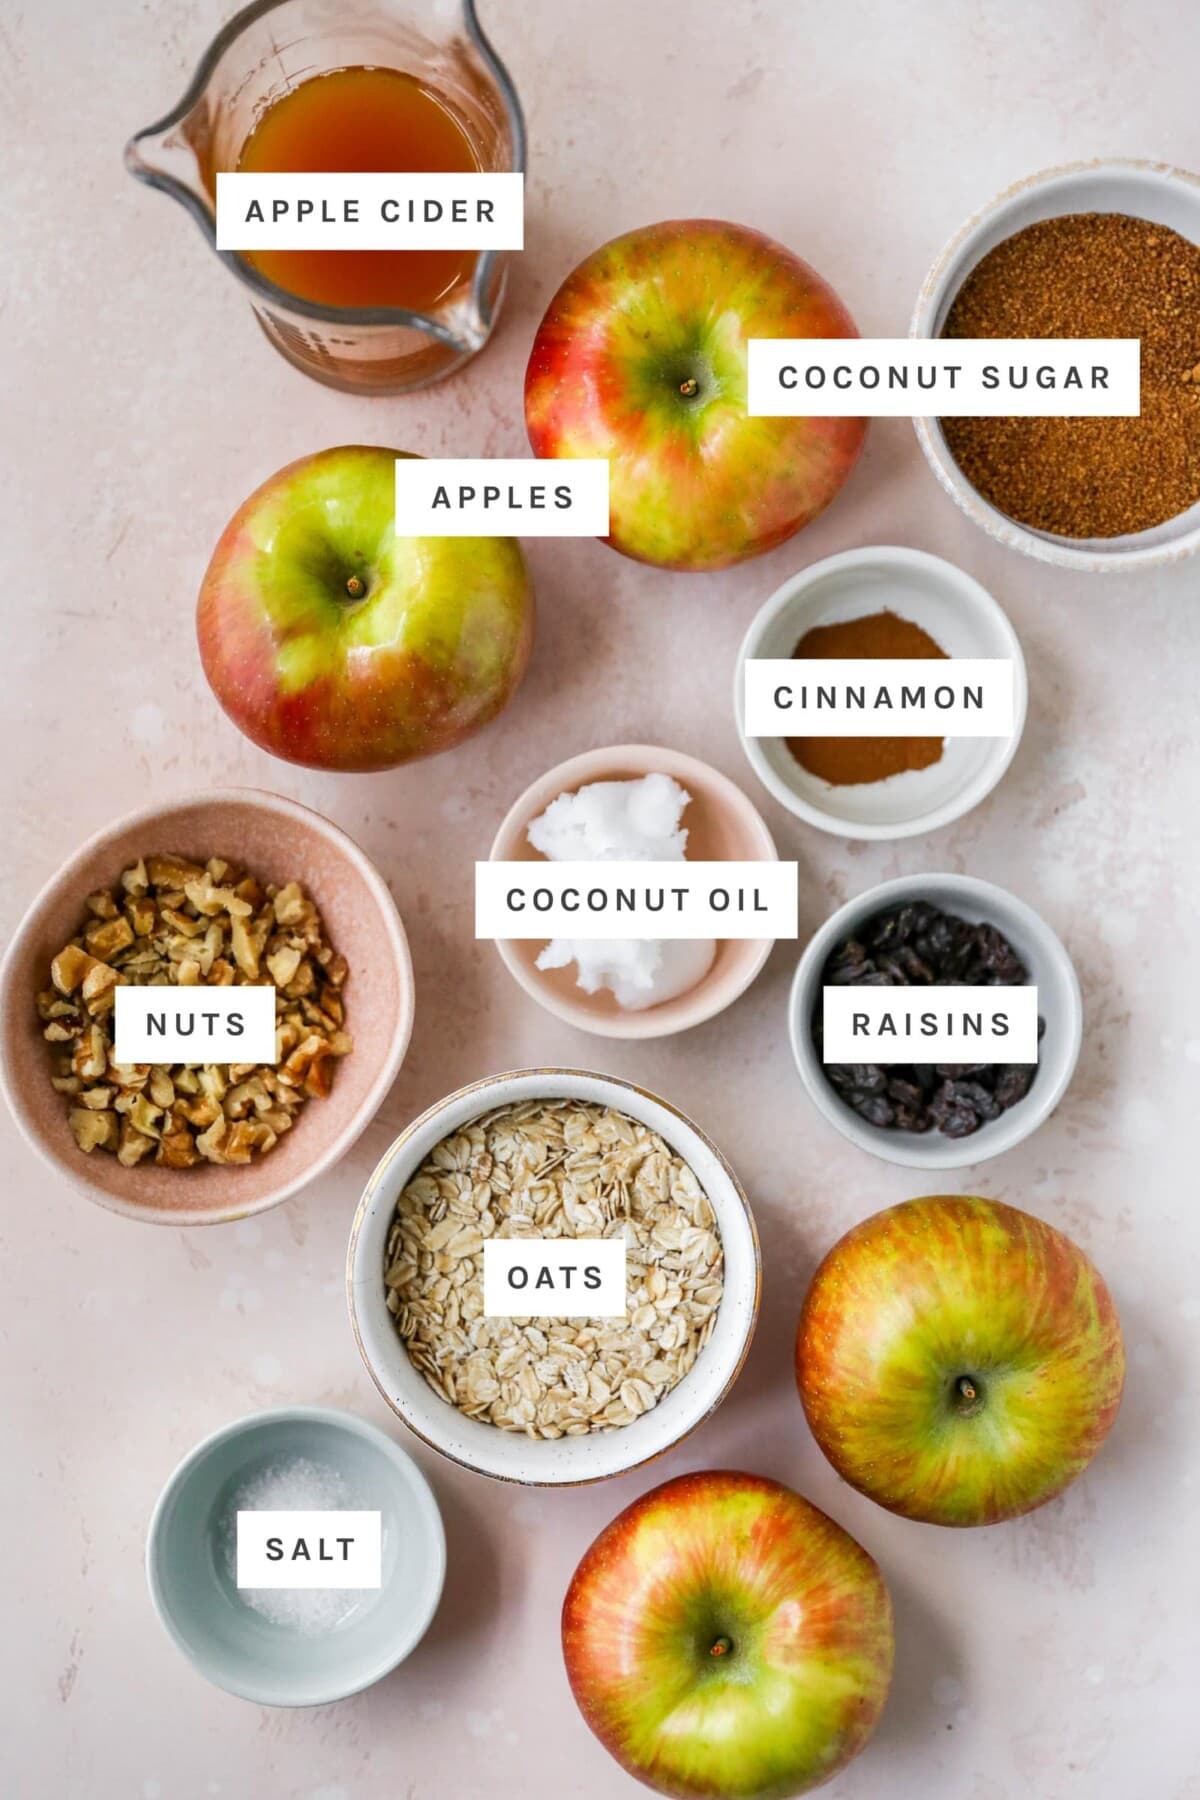
- apples – you want to make sure you use a firm, slightly sweet apple. I dive into this more below but I like using Honeycrisp, Fuji or Pink Lady apples!
- old fashioned rolled oats – for the crumble filling. Make sure you grab gluten-free oats if needed.
- coconut sugar – the less-processed upgrade for granulated sugar or brown sugar.
- chopped walnuts or pecans – any chopped nut works for this recipe, but I prefer the flavor of walnuts or pecans.
- raisins – optional but adds extra flavor, texture and a slight sweetness to the apples.
- cinnamon – the perfect spice pairing!
- salt – to bring all of the flavors together.
- coconut oil – unsalted butter also works. Make sure either is softened to room temperature for this recipe.
- warm water, apple cider or apple juice – prevents the apples from drying out or burning during baking.
Substitutions
- Coconut sugar: Brown sugar or maple syrup can easily replace coconut sugar. Brown sugar will give the filling a richer, caramel-like flavor, while maple syrup adds a subtle sweetness.
- Nuts: If walnuts or pecans aren’t your thing, you can swap them out for almonds or even skip the nuts altogether if you prefer. For a nut-free option, you could try sunflower seeds, pumpkin seeds, shredded coconut, or some crunchy granola.
- Raisins: Not into raisins? Dried cranberries or chopped dried apricots work well. They add a nice bit of sweetness and a chewy texture to the filling.
How to Core and Prep Apples
Fair warning: this is the hardest and most time-consuming part of the recipe! Don’t attempt this recipe unless you’re feeling patient… ha! Start by using a paring knife to cut around the core about halfway down into the apple. Make sure you don’t cut through the bottom of the apple.
Use a spoon, apple corer, melon baller or grapefruit spoon to carefully dig out the core and then scoop out more of the apple and any other seeds so you have a little cavity inside your apple that is about 1.5 inches wide.
Step by Step Process
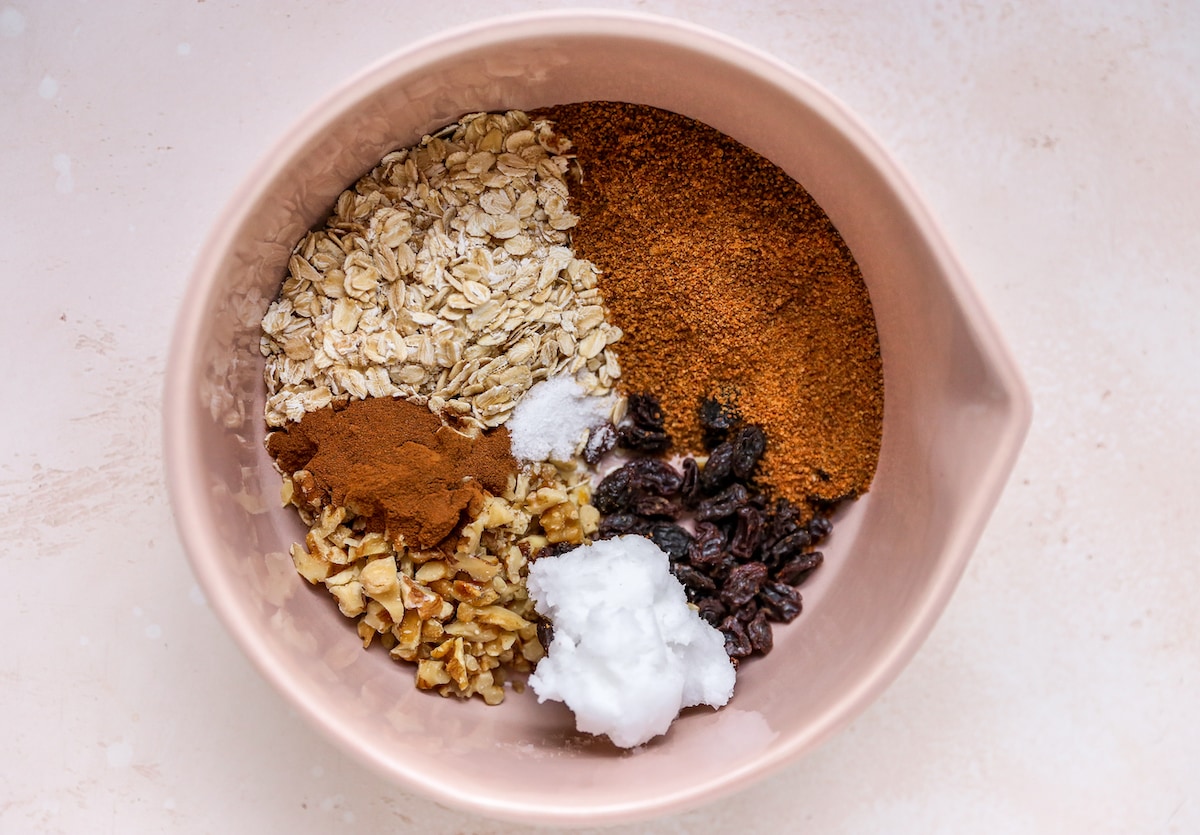
Step 1: Preheat your oven and add all the ingredients (except apples) to a large bowl.
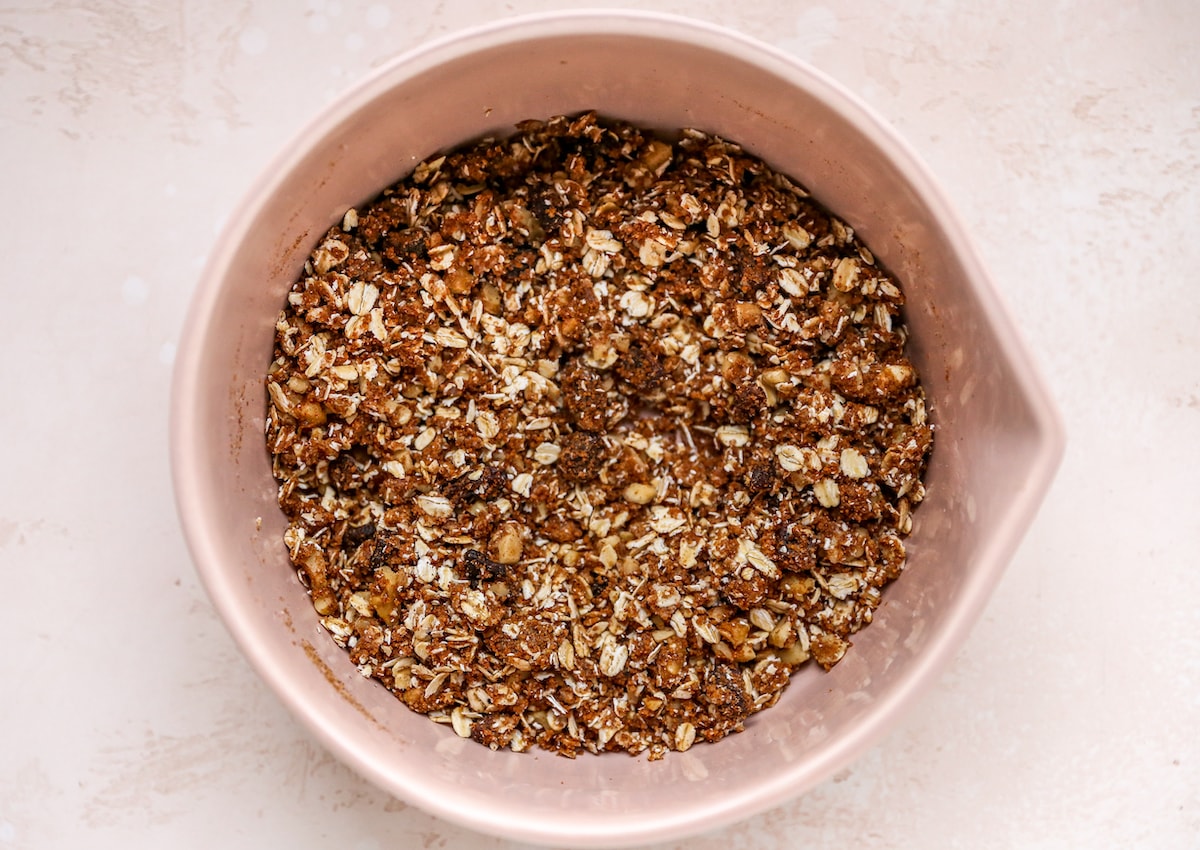
Step 2: Mix to combine the crumble and begin prepping the apples.
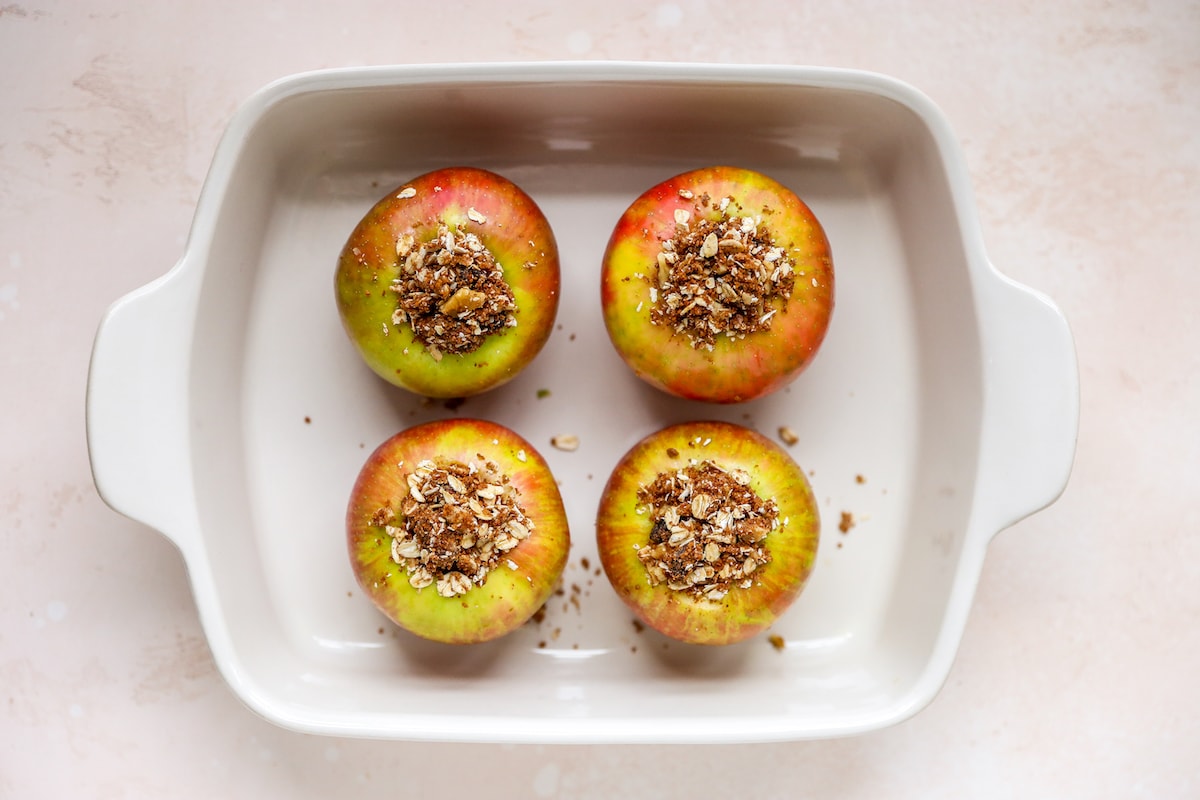
Step 3: Add the apples to a baking dish and spoon in the crumble mixture.
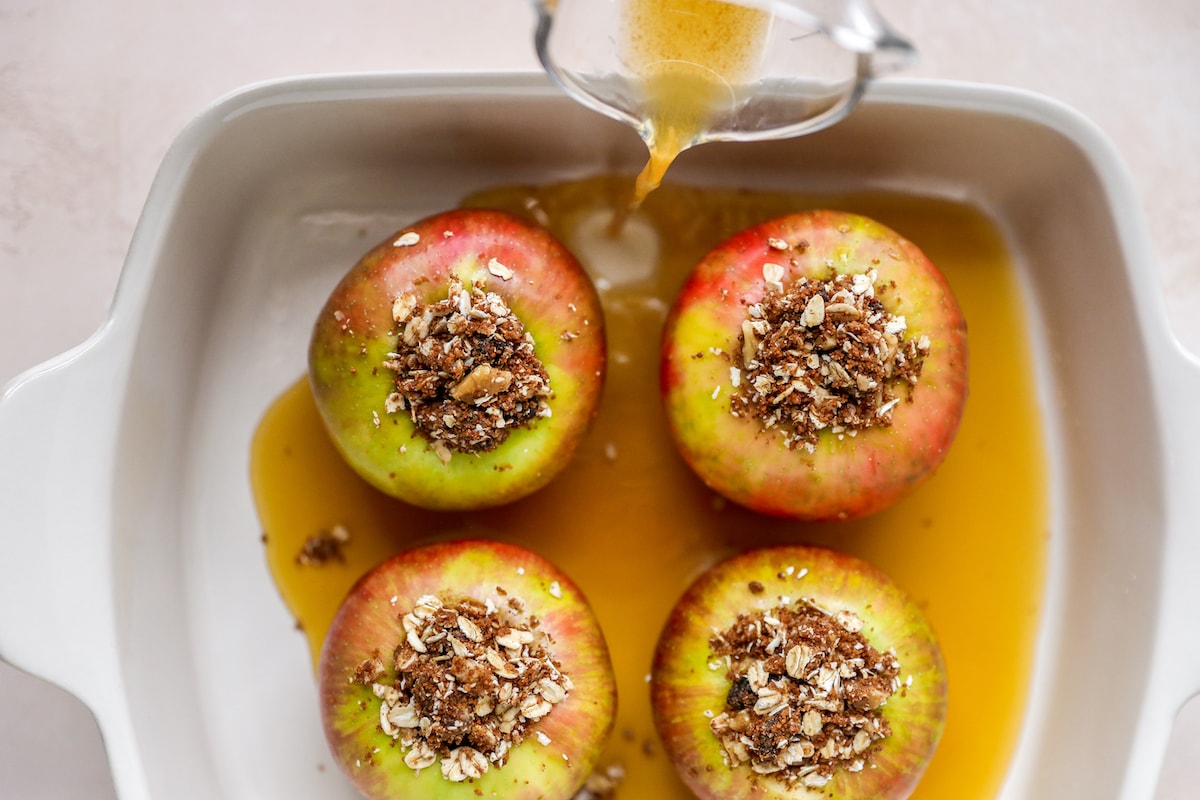
Step 4: Pour the warm water or apple juice/cider around the apples and bake for 45-50 minutes.
Brittany’s Tip
Don’t forget the liquid – Pouring a bit of warm water, apple cider, or apple juice around the apples keeps them moist and prevents burning. This little trick makes the apples tender and gives you a yummy sauce to spoon over the top. Trust me, it’s worth it!
How to Serve Baked Apples
These easy baked apples are decadent and delicious on their own but if you want to take them to the next level… I have some ideas.
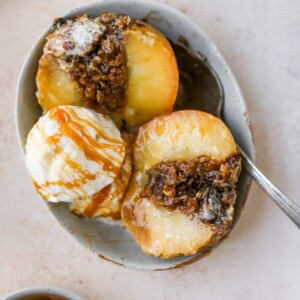
- Ice cream – Serve with a scoop of vanilla ice cream. I love Halo Top Creamery vanilla ice cream, which is a low cal/low sugar ice cream that actually tastes pretty darn good!
- Whipped cream – Top with a dollop of whipped cream or coconut whipped cream for an extra creamy touch that pairs perfectly with the warm apples.
- Caramel – Drizzle with homemade date caramel sauce.
- Extra sweet – Sprinkle with a dash of cinnamon and drizzle of pure maple syrup or honey.
- Yogurt – Add a dollop of creamy Greek or coconut yogurt for a little tang that balances the sweetness of the apples. It’s the perfect touch to make these baked apples feel just right for breakfast, too!

How to Store Leftovers
Leftover baked apples store really well. Allow the apples to cool slightly before storing them in an airtight container. They will keep in the refrigerator for up to 5 days. I recommend popping them back in the oven (at 375°F) to reheat but you can microwave them if you’re in a time crunch.
Frequently Asked Questions
You want to make sure you have a firm, slightly sweet apple for this recipe! We don’t want mushy, flavorless apples when we’re done baking. I like using Honeycrisp, Fuji or Pink Lady apples – try making a few different kinds of apples and see what your favorite is!
It’s best to avoid softer apples like McIntosh, Red Delicious, and Gala. These varieties tend to break down quickly, turning mushy instead of holding their shape.
You don’t need to peel the apples before baking—leaving the skin on adds extra fiber and helps the apples hold their shape. Plus, the skin gives a nice texture and keeps more nutrients in the mix. But if you prefer a smoother filling, feel free to peel them. It’s totally up to your taste and texture preference.
Baked apples are still packed with healthy nutrients, including fiber, which keeps you feeling full and supports digestion. While baking can reduce some heat-sensitive vitamins like vitamin C, you’re still getting plenty of benefits. Baked apples are also easier to digest, making them a cozy, comforting option that’s naturally sweet and satisfying. And if you’re skipping heavy sugars and sticking to wholesome ingredients, they’re a dessert you can feel good about!
The apples are ready when they’re soft enough to pierce easily with a fork. For softer, more tender apples, bake closer to 60 minutes. If you like a bit of bite left in the apple, check around the 45-minute mark.
More Apple Recipes to Try
Be sure to check out the full collection of dessert recipes here on EBF!
If you enjoyed this recipe, please consider leaving a ⭐ star rating and let me know how it went in the 📝 comments below.
Baked Apples
Ingredients
- 4 large apples, (I like using Honeycrisp, Fuji or Pink Lady)
- ⅓ cup old fashioned rolled oats
- ¼ cup coconut sugar
- ¼ cup chopped walnuts or pecans
- 2 Tablespoons raisins, optional
- 1 teaspoon cinnamon
- ⅛ tsp salt
- 3 Tablespoons coconut oil or unsalted butter (vegan if needed), softened to room temperature
- ¾ cup warm water, apple cider or apple juice
- For serving: vanilla ice cream, coconut whip cream, date caramel sauce, dash of cinnamon
Instructions
- Preheat oven to 375°F.
- Add the oats, coconut sugar, chopped nuts, raisins (if using), cinnamon, salt and coconut oil to a bowl. Mix together until combined.
- Using a paring knife, cut around the core, about halfway or 3/4 down into the apple. Make sure to not cut through the bottom of the apple. Use a spoon to carefully dig out the core. Once the core is out, use a spoon to scoop out some of the apple and to dig out any more seeds so that you have a cavity about an inch and a half wide. This takes a bit of patience and arm muscle. This can also be done with an apple corer, melon baller or grapefruit spoon.
- Transfer your apples to a 8 or 9 inch baking dish, standing them upright, and if they wobble you can slice a little bit off the bottom to make them more stable. Spoon cinnamon oat filling into each apple, filling all the way to the top.
- Pour the warm water or apple juice/cider around the apples in the bottom of the dish. This helps prevent the apples from drying out and burning.
- Bake for 45-60 minutes or until the apples are easily pierced with a fork. The longer you bake them the softer and mushier your baked apples will be.
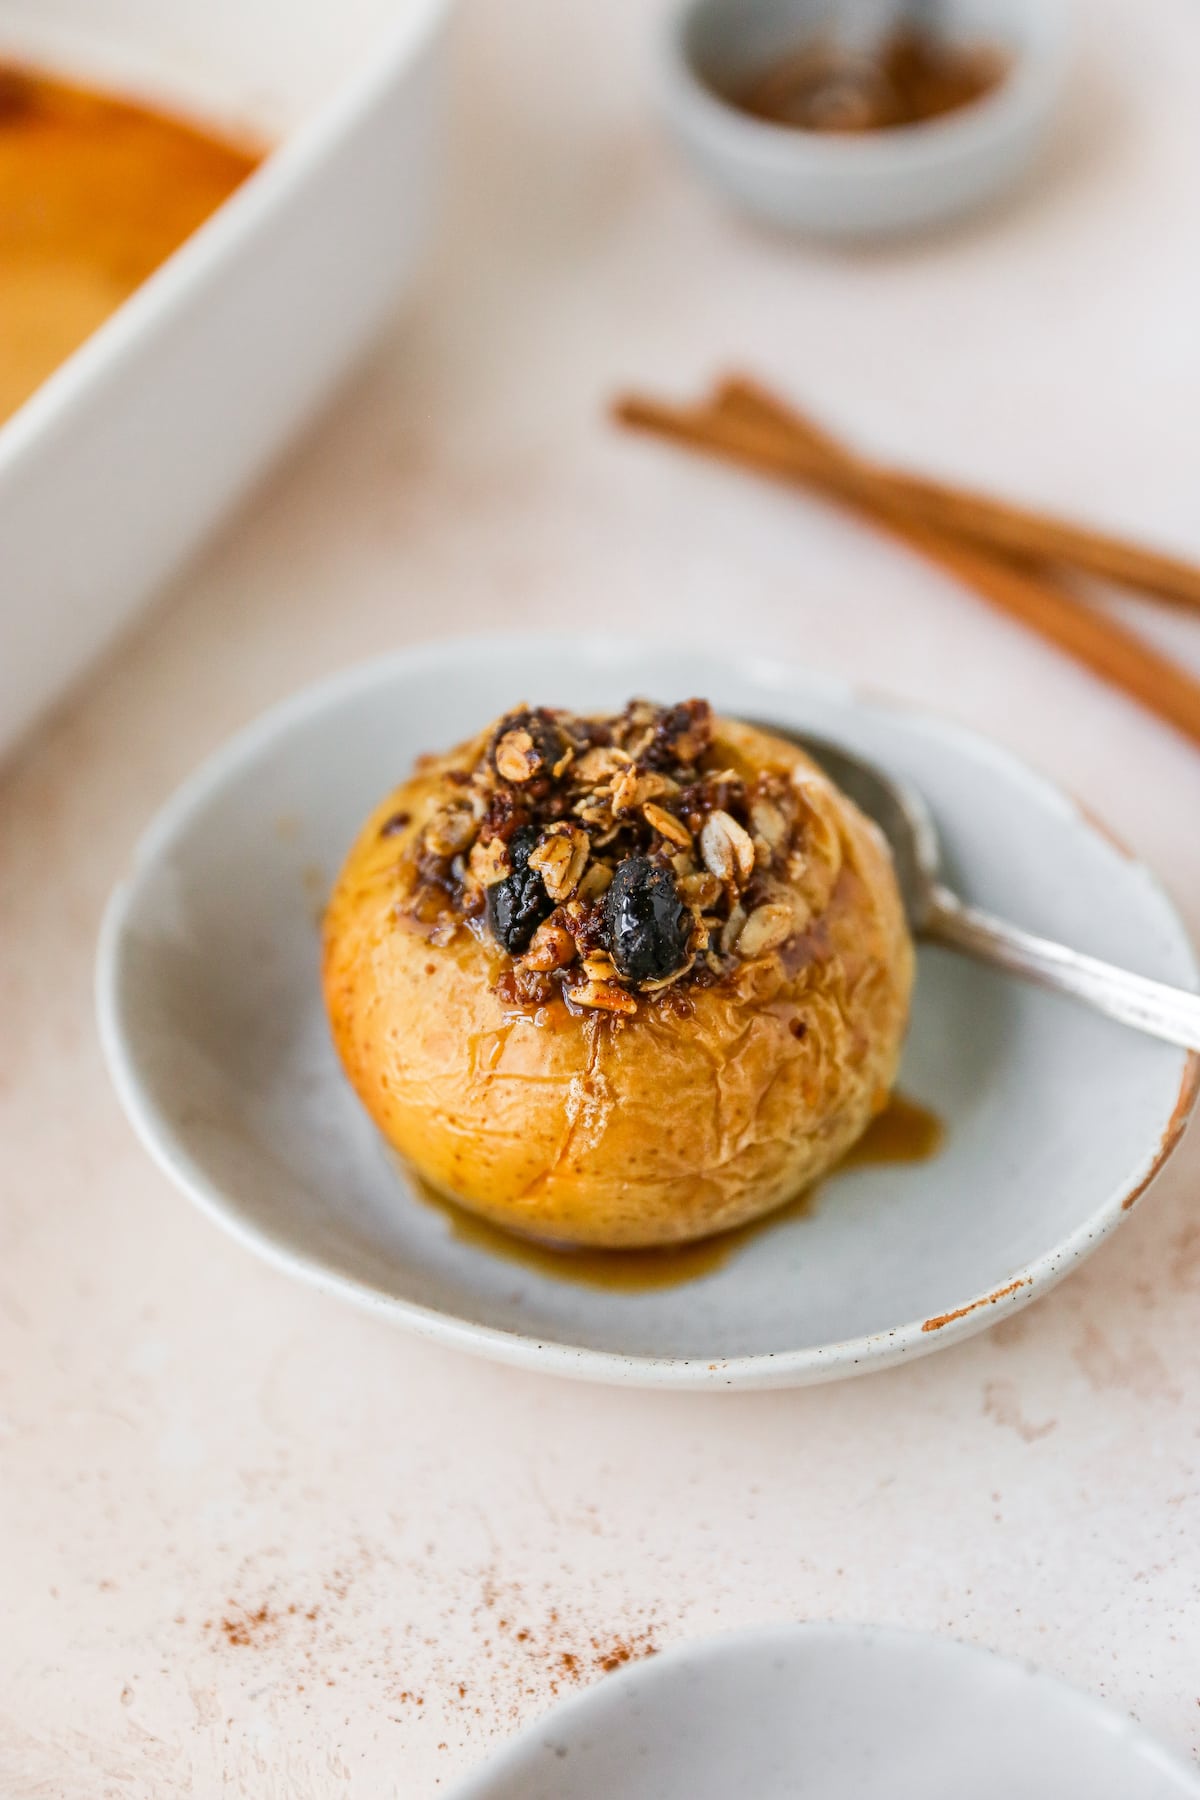
- Remove apples from the oven and spoon the liquid from the pan over the apples before serving. This adds a little moisture to the skin, but it’s completely optional.
- Serve warm with coconut whipped cream or ice cream, date caramel sauce and a dash of cinnamon.
Notes
- Coconut sugar: You can use granulated sugar or brown sugar instead.
- Nuts: Any chopped nut works for this recipe. You can also omit the nuts and use more raisins or oats if you have a nut allergy.
- Storage: Leftover baked apples keep well! Let them cool, then store in an airtight container in the fridge for up to 5 days. For reheating, pop them in the oven at 375°F or use the microwave if you’re short on time.
Nutrition
Nutrition information is automatically calculated, so should only be used as an approximation.
Like This Recipe? Rate & Comment Below!


Love this for a not too sweet dessert or after school snack
YAY! I am so glad this recipe is a hit, Traci. Thank you for your review + star rating, I really appreciate it!
Such a great fall desert! A perfect do ahead recipe for that night. I prepped the apples and filled them with the oatmeal mixture, then all I had to was add the warm water right before popping it into the oven. The vegan caramel sauce was so good too!! Thanks so much!
Woo!! Happy to hear these baked apples were a hit, Maureen! Thanks so much for the review and star rating. I really appreciate the feedback!
Such a yummy recipe!! Was having friends over for dinner and this made for a perfect fall desert! I prepped the apples, filled them with the oatmeal mixture then just needed to add the warm water right to the baking pan right before popping it into the oven. Made the house smell so good! Thank you!! The vegan caramel sauce was so good and made a decadent topping too!! A hit with