
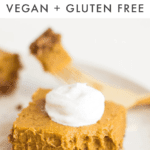
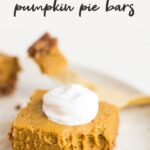
No Bake Pumpkin Pie Bars
36
Published Nov 09, 2017, Updated Jan 21, 2024
This post may include affiliate links. Thank you for your support.
These decadent no bake pumpkin pie bars pair a crunchy granola crust with a creamy, thick pumpkin filling with coconut oil and cashew butter. Vegan & gluten-free.
Last week I shared a sweet and savory wild rice stuffing recipe for Thanksgiving, but now it’s time to move on to dessert! Dessert is the best part about the holidays anyhow, amirite?
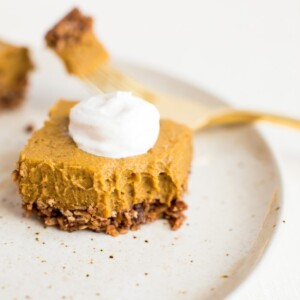
Of course pumpkin pie is a quintessential Thanksgiving dessert, but I honestly think this no bake version of pumpkin pie is even better than the baked version. The filling has such a great texture because it is chilled, thick and creamy. I enjoy it so much more than the fluffy custard-like filling that pumpkin pie can sometimes have.
If you’re in the same boat, you will LOVE these no bake pumpkin pie bars! And the whole no bake thing means that you don’t have to deal with the hassle of an oven, which works out perfectly considering most folks have a big ol’ turkey and lots of sides hogging all the oven space on Thanksgiving Day.

As I mentioned, the filling in these no-bake pumpkin pie bars is especially rich, thick and creamy, but the best part might be the granola crust.
By using only three ingredients – coconut oil, dates and granola – you can have yourself the perfect crunchy crust that holds together well. I’d personally choose a granola crust over a graham cracker or shortbread crust any day! Who’s with me?!
Ingredients in These No Bake Pumpkin Pie Bars
- granola – I tested the recipe with 3 different varieties of granola and the crust held together each time. I found the Purely Elizabeth granola worked best. If your crust seems dry and doesn’t seem to be holding together well, add another 1-2 Tablespoons of coconut oil.
- medjool dates – You can buy medjool dates that are already pitted or pit them yourself (it’s super easy). Two brands that I like are Natural Delights and Joolies. You can find Natural Delights in the produce section of most grocery stores (near the bananas) and Joolies are offered on Amazon and Thrive Market.
- pumpkin puree – if you’re using store-bought canned pumpkin make sure you grab pumpkin puree and not pumpkin pie filling, which is usually sweetened. I also have a homemade pumpkin puree recipe if you’re interested!
- cashew butter – I haven’t tested these bars with a different nut or seed butter, so I’m not sure how they’d turn out. I think cashew butter works best because it’s extra creamy, so I highly recommend using that for the best results. If you try another nut/seed butter, please let me know in the comments.
- coconut oil – this helps hold the granola crust together.
- pumpkin pie spice – you can make your own pumpkin pie spice blend or use store-bought!
- vanilla, cinnamon and sea salt – seasonings and spices to bring the flavors together.

How to Make No Bake Pumpkin Pie Bars
Make crust: First, you’ll want to make your granola crust. Add your granola to a food processor and process until the granola is the size of graham cracker crumbs. Add coconut oil and dates to the food processor and process until mixture is well combined and sticking together. Next, pour the crust mixture into an 8×8 baking dish lined with parchment paper. Use your hands to press the mixture firmly into an even layer along the bottom of the dish. Place dish in the fridge to allow the crust to harden up.
Make filling: While the crust is setting in the fridge, clean out your food processor and assemble it to use it again. Add your dates to the food processor and process until dates have turned into a sticky paste. A ball might form and this is okay. Just break the ball apart with your hands. Add remaining pumpkin filling ingredients to the processor (pumpkin, cashew butter, coconut oil, pumpkin pie spice, vanilla, sea salt and cinnamon). Turn on your food processor and blend until the mixture is completely combined and smooth. There may be a few specks of the dates visible, but the mixture should be smooth.
Set: Remove the pie crust from the fridge and pour the pumpkin pie filling into it. Use a spoon or spatula to spread the filling evenly. Now all you have to do is place the dish back into the fridge for at least 4-6 hours but overnight is best. This will give the mixture time to really thicken and set up.

Coconut Oil Used As a Binder
As you’ll notice, this recipe doesn’t require any butter for the crust or binders for the filling and that’s because we’re using coconut oil. Coconut oil hardens up when it’s chilled and helps to hold everything together.
Of course the dates and cashew butter also help to thicken up the pumpkin pie filling, but the coconut oil is definitely the saving grace when it comes to keeping the crust together.
I’m sure most of you are fully aware, but coconut oil is great for vegan baking/desserts. I use it all the time! For this recipe I’m teaming up with Nature’s Way and using their organic extra virgin coconut oil which is cold-pressed and not refined, deodorized or bleached.

How to Prep Pumpkin Pie Bars in Advance
If you’re like me and enjoy getting a few things knocked off your list before Thanksgiving Day, then this recipe is perfect for you as the pumpkin pie bars need a few hours to set up so you’re forced to make them in advance. This allows you to get it out of the way so come Thanksgiving Day you can serve your delicious dessert with minimal effort.
To prep these bars in advance, simply make the bars as directed below and place the dish back in the fridge for at least 4-6 hours, but overnight is best. This will give the mixture time to thicken and set up. Once set, remove from the fridge, cut the bars and serve.
How to Serve
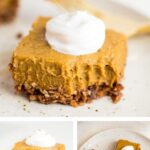
Ready to serve? Remove the dish from the fridge and cut into 12 even squares. The bars are fabulous on their own, but feel free to spruce them up with a dollop of store-bought or homemade coconut whipped cream.
More Holiday Recipes to Try
- Apple Pie Filling
- No Bake Mini Apple Pies
- Vegan Chocolate Pie
- Healthy Dutch Apple Pie
- Puppy Chow
- Easy Pecan Pie
- Hanukkah Gelt Peanut Butter Blossoms
Be sure to check out the full collection of pumpkin recipes and a collection of Thanksgiving recipes here on EBF.
No Bake Pumpkin Pie Bars
Ingredients
Granola Crust
- 3 cups granola*
- 2 Tablespoons solid coconut oil
- 10 pitted medjool dates
Pumpkin Pie Filling
- 3 Tablespoons melted coconut oil
- 6 medjool dates, pitted
- 1 cup canned pumpkin or homemade pumpkin puree
- ½ cup cashew butter
- 1 teaspoon pumpkin pie spice
- ½ teaspoon vanilla
- ½ teaspoon cinnamon
- ⅛ teaspoon sea salt
Instructions
- Add granola to a food processor and process until the granola is the size of graham cracker crumbs. Add coconut oil and dates to the food processor and process until mixture is well combined and sticking together.
- Pour crust mixture into an 8×8 baking dish lined with parchment paper. Use your hands to press the mixture firmly into an even layer along the bottom of the dish. Place dish in the fridge to allow the crust to harden up.
- Wipe out your food processor container, replace blade and add dates to the processor. Process until dates have turned into a sticky paste. A ball might form and this is okay. Just break the ball apart with your hands.
- Add remaining pumpkin filling ingredients to the processor (pumpkin, cashew butter, coconut oil, pumpkin pie spice, vanilla, sea salt and cinnamon). Turn on food processor and blend until mixture is completely combined and smooth. There may be a few specks of the dates visible, but the mixture should be smooth.
- Grab crust from the fridge and pour pumpkin pie filling over it. Use a spoon or spatula to spread the filling evenly.
- Place dish back in the fridge for at least 4-6 hours, but overnight is best. This will give the mixture time to thicken and set up. Once set, remove from the fridge, cut the bars and serve. Top each bar with a dollop of coconut whipped cream for serving if you wish.
- Leftovers can be stored in the fridge for up to 4 days.
Notes
- I tested the recipe with 3 different varieties of granola and the crust held together each time. I found the Purely Elizabeth granola worked best. If your crust seems dry and doesn’t seem to be holding together well, add another 1-2 Tablespoons of coconut oil.
- The bars are fabulous on their own, but feel free to spruce them up with a dollop of store-bought or homemade coconut whipped cream.
Nutrition
Nutrition information is automatically calculated, so should only be used as an approximation.


I had trouble with this, probably because I have a small food processor that’s part of a hand held immersion blender set. So I had to physically press the button to keep it processing. I don’t think the dates are as well integrated in either the crust or the filling as they are supposed to be. It’s in the fridge now and I’ll see what it’s like in the morning. But I an see small chuck of dates in both and I suspect that’s not how it’s supposed to be.
I made this recipe twice so far for Thanksgiving and it was super easy and super delicious! Both groups of people loved it and wanted to know the recipe. The coconut whip cream was a nice added addition on top as well!
Yum! Can’t wait to try – did you use the PB chocolate granola from purely Elizabeth? Ever since you talked about that granola we can’t stop buying it! Obsessed. Also do you think you could sub almond butter for cashew butter? Thanks!
Hi Lauren – I found that the original granola from Purely Elizabeth worked the best, but I’m sure using the chocolate granola from them would also be delicious! In regards to the almond butter, I think cashew works best because it’s extra creamy, but almond butter will likely work too. Although I haven’t tried it so I’m not entirely sure how it will turn out. Let me know if you decide to try it!
These are mouth-watering! Do you think I can use carrots instead of a pumpkin?
Hey Deepika – The pumpkin is a main component to this recipe. I am not sure how mashed carrots would work as a replacement, but you could definitely try it! I’m just not sure if they will turn out the same. Let me know if you do end up using carrots and how it turns out for you.
Love this!! It was also a total hit with our dinner guests! I love that the crust is made from granola and that you used dates to bind and sweeten the crust and filling. So yum!!
Ahh yay!! So glad these bars were a hit! Thanks for making them and for coming back to leave a comment + star rating. I really appreciate it. <3
These came out great! Follow the directions exactly had no problems. I kept them in the refrigerator an extra day and they were just as good the next day.
Woo!! So thrilled to hear these were a hit, Robin! Thanks so much for making them and coming back to leave a review. It means the world to me!