
Easy Healthier Butterfingers
73
Published Oct 26, 2020, Updated Oct 07, 2022
This post may include affiliate links. Thank you for your support.
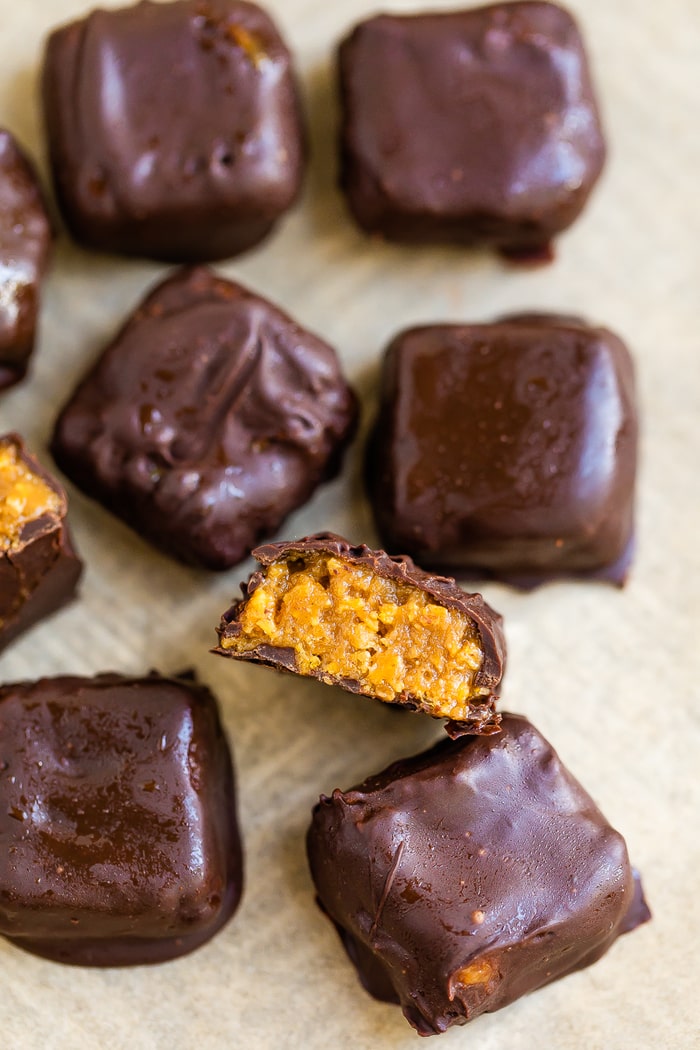
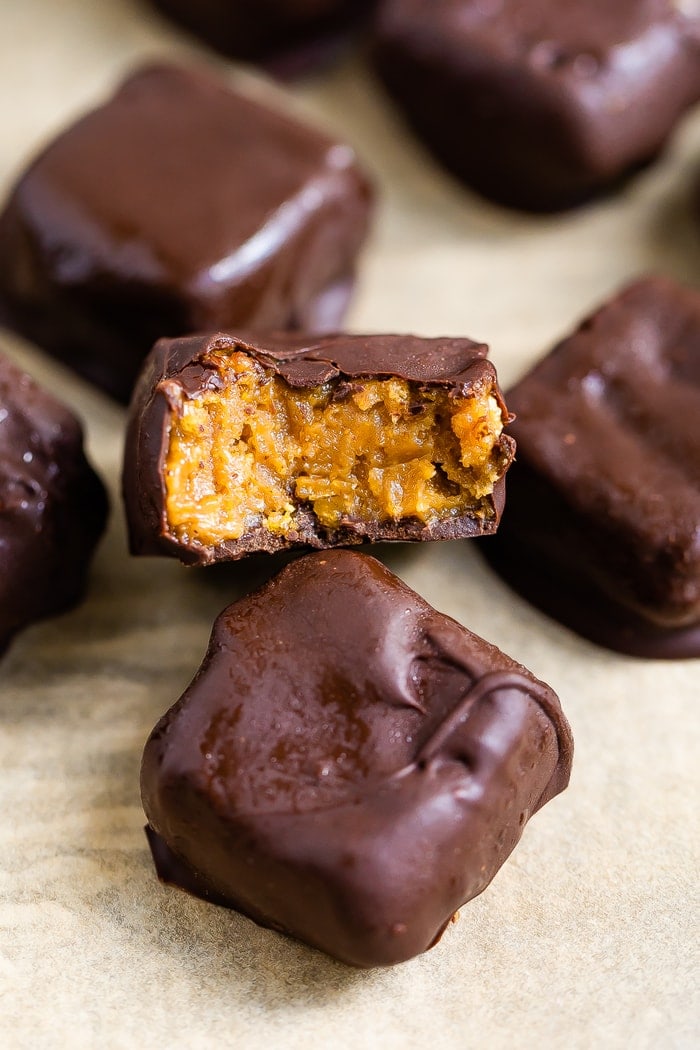
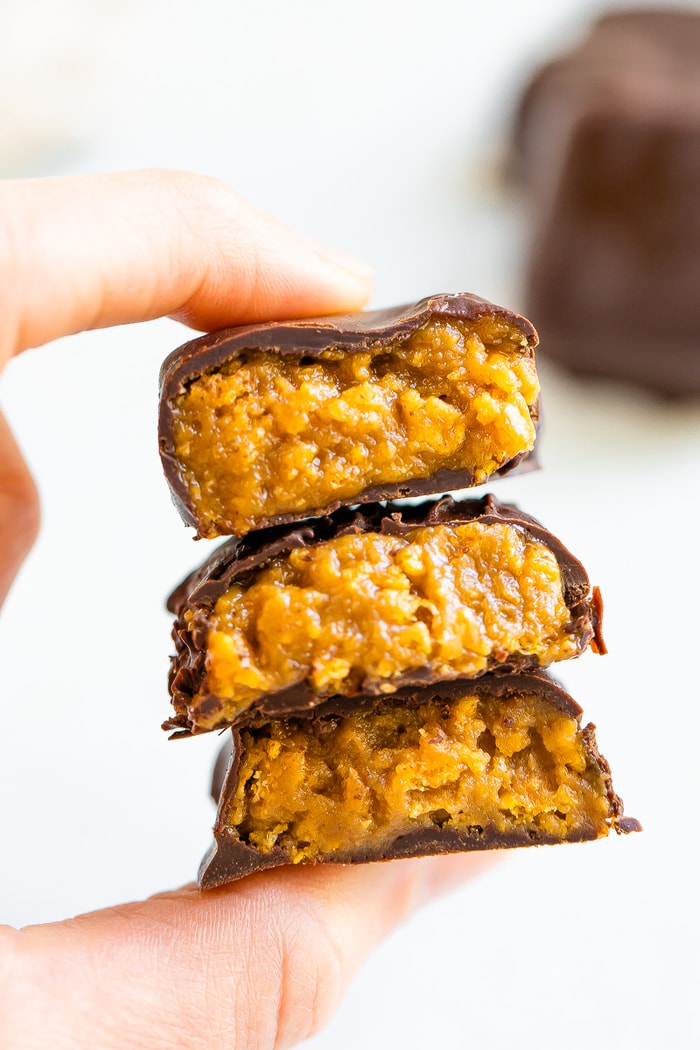
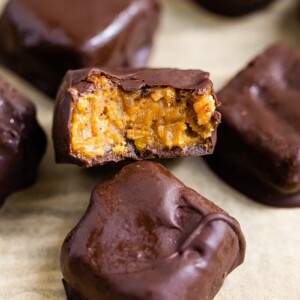
These healthier Butterfingers are made with only six simple ingredients. They’re crunchy, peanut-buttery and taste like the real deal.
To say I’m excited to share this recipe would be the understatement of the year. Isaac loves Butterfingers so I don’t know why it’s taken me so long to make an upgraded version. I originally made full-sized Butterfinger bars, but they were super rich so I decided to make mini Butterfingers instead.
I don’t know about you, but I love a good bite-size treat.
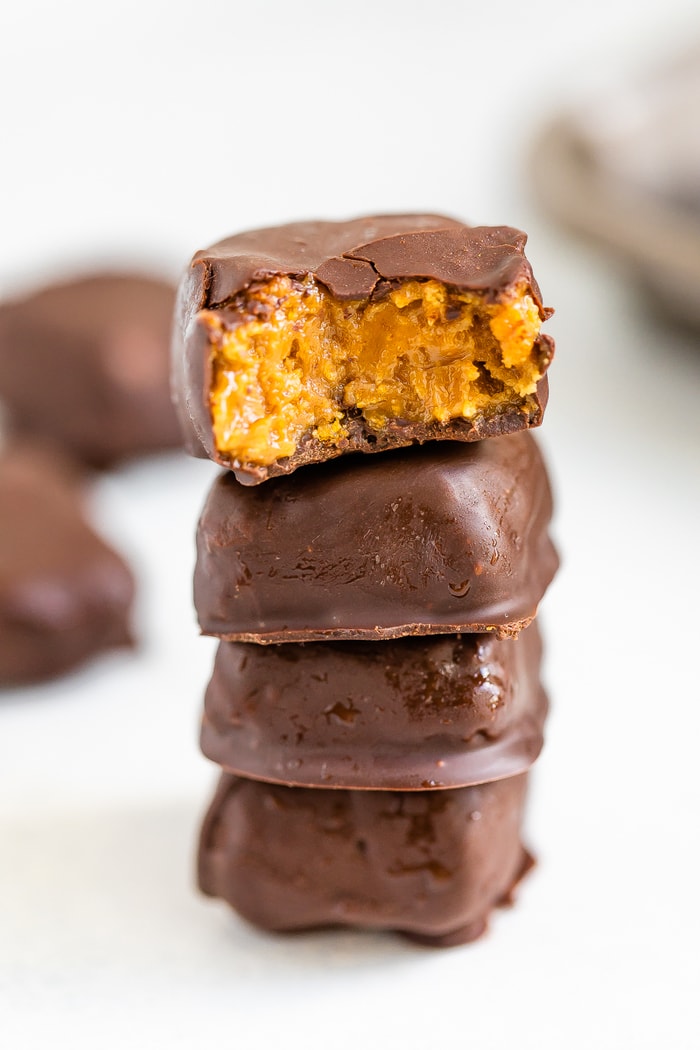
These upgraded treats are made with only six ingredients. The recipe does take a little patience as certain parts need to set in the freezer, but I promise the wait is 100% worth it! Plus, it doesn’t get much better than homemade Butterfingers.
Healthier Butterfingers Ingredients
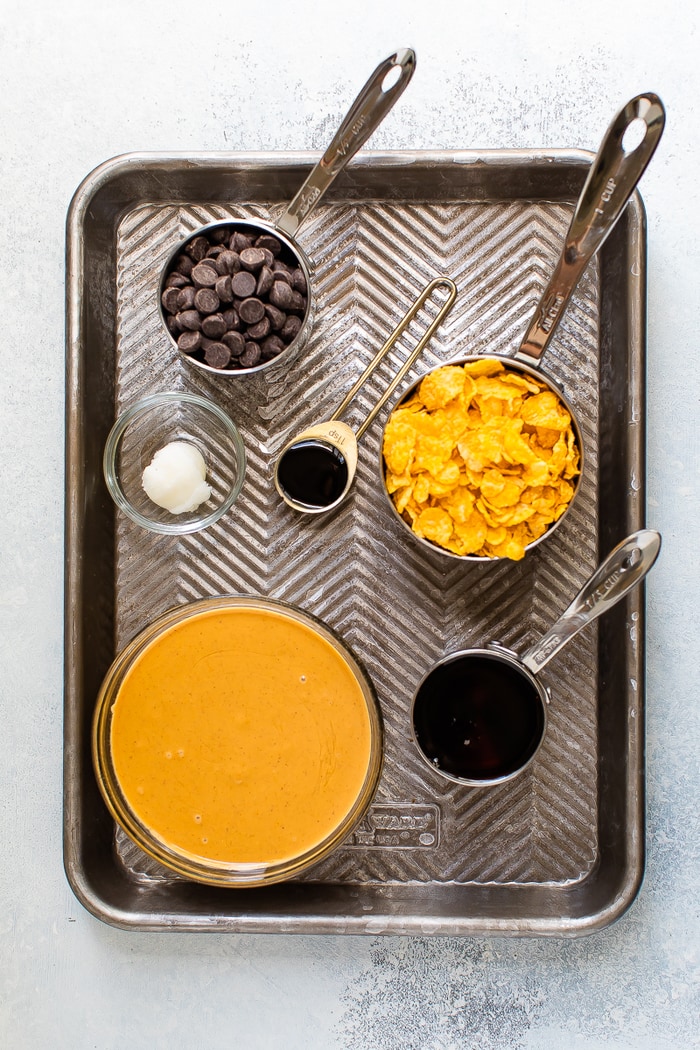
- organic corn flakes – There are a few organic corn flake options on the market. Look for Barbara’s, Arrowhead Mills or Nature’s Path.
- drippy peanut butter – make sure to use drippy/runny natural peanut butter. I used Crazy Richard’s.
- maple syrup – I’ve only tried this recipe with maple syrup, but I assume it will work with honey as well.
- molasses – this is optional, but recommend if you have it on hand because it helps give this recipe that well known Butterfinger flavor!
- chocolate chips – I love Lily’s chocolate chips for a low-sugar option and Enjoy Life chocolate chips for a dairy-free/soy-free option.
- coconut oil – this is used to help make the melted chocolate thinner, which makes it easier to dip the Butterfingers. You can skip it, but your melted chocolate will likely be pretty thick. I recommend using refined coconut oil if you don’t want any coconut flavor!
How to Make Homemade Butterfingers
Crush cornflakes – Place cornflakes in a small lunch-size plastic bag and crush into small pieces. I used the bottom of a glass jar to pound/crush the flakes.
Heat peanut butter – Heat the peanut butter, maple syrup and molasses (if using) over low-medium heat. Stir until the mixture is combined – don’t overheat or you’ll risk scorching the peanut butter! After the ingredients are combined, remove from the heat and stir in the crushed corn flakes.
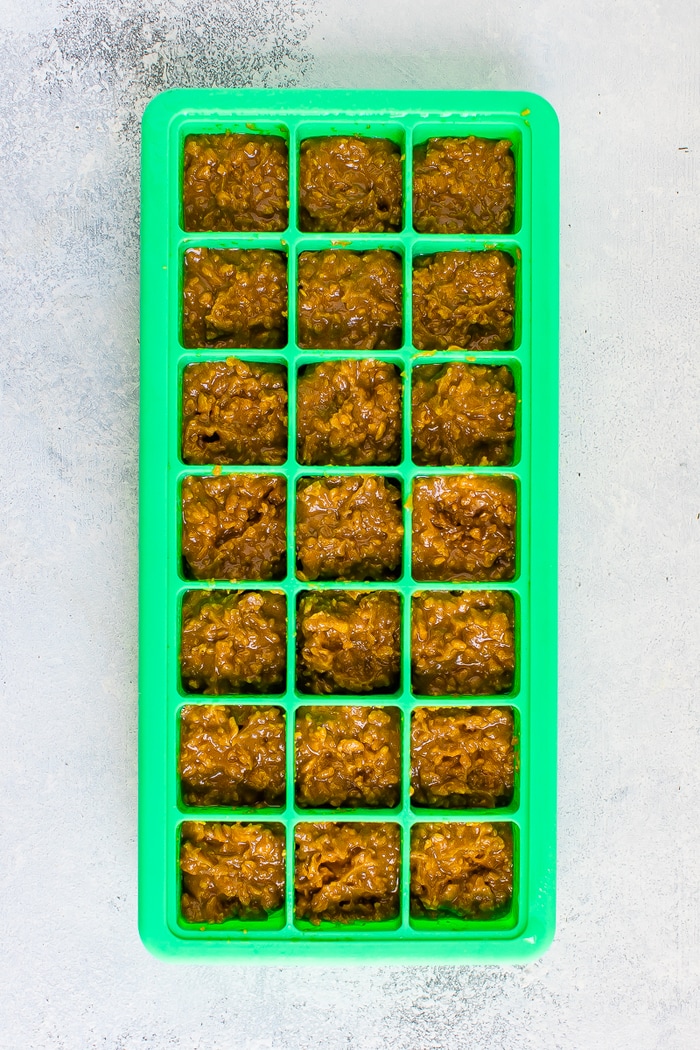
Make bites – Spoon the coated cornflakes into a silicone ice cube tray, filling each cavity about halfway full. Place the ice cube tray in the freezer for the bites to harden. This took about 2 hours for me. If you don’t have a silicone ice cube tray you can simply spread the mixture evenly over a parchment lined baking sheet. Let set in the freezer and then chop into small squares.
Melt chocolate – Once the bites have hardened, place the chocolate and coconut oil in a microwave safe bowl and melt in the microwave in 15 second increments, stirring between each. It shouldn’t take longer than 1-2 minutes total for the chocolate to melt.
Coat candy – Pop the frozen bites out of the ice cube tray and place each into the melted chocolate. Use a spoon to coat until completely covered. Let excess chocolate drip off and place the chocolate covered candy on a platter lined with parchment paper. Repeat until all pieces are coated. If some of your bites start to soften during the process, pop them back in the freezer.
Freeze – Place the tray of bites back into the freezer to let the chocolate harden. Once chocolate has set, it’s time to enjoy!
How to Store Healthy Butterfinger Bites
I recommend storing these bites in an airtight container in the freezer. They should last 1-2 months… but I bet they’ll be gone in a week! Ha! I recommend enjoying them straight from the freezer so they’re nice and crisp.
More Healthy Treats to Try:
- Chocolate Covered Snickers Stuffed Dates
- 5-Ingredient Healthier Peanut Butter Cups
- Chocolate Peanut Butter Banana Bites
- Pillowy Soft Pumpkin Cookies
- No Bake Almond Cookies
- Coconut Crunch Donuts (Hostess Copycat)
- Healthy Almond Joy Bars
Be sure to check out all of the dessert recipes on EBF!
Healthier Butterfingers
Ingredients
- 1 1/2 cups organic corn flakes
- 3/4 cup drippy peanut butter
- 1/3 cup maple syrup
- 1 teaspoon molasses, optional
- 1/2 cup chocolate chips
- 1 teaspoon coconut oil
Instructions
- Crush cornflakes: Place cornflakes in a small lunch-size plastic bag and crush into small pieces.
- Heat peanut butter: Add peanut butter, maple syrup and molasses (if using) to a small saucepan over low-medium heat. Heat, while stirring until the mixture is combined. Don’t overheat or you’ll risk scorching the peanut butter.
- Once well combined, remove from heat and stir in crushed corn flakes.
- Spoon coated cornflakes into a silicone ice cube tray, filling each cavity about halfway.
- Place ice cube tray in the freezer for bites to harden for at least 2 hours.
- Melt chocolate: Once bites have hardened, place chocolate and coconut oil in a microwave safe bowl and melt in the microwave in 15 second increments, stirring between each. It shouldn’t take longer than 1-2 minutes total for the chocolate to melt.
- Pop bites out of the tray and place on platter lined with parchment. Dip/coat each into the melted chocolate, one at a time. Use a spoon to coat until completely covered. Place chocolate covered candy back on the platter lined with parchment. Repeat until all pieces are coated.
- Freeze: Place bites back into the freezer to let the chocolate harden and enjoy!
- Storage: Bites keep best stored in the freezer in an airtight container. They should last 1-2 months. Enjoy straight from the freezer.
Video
Notes
- If you don’t have a silicone ice cube tray you can simply spread the mixture evenly over a parchment lined baking sheet. Let set in the freezer, chop into small squares and then dip each in chocolate as described above.
Nutrition
Nutrition information is automatically calculated, so should only be used as an approximation.


These are super easy to make with ingredients I mostly had on line.
Can I just microwave all the ingredients together then add the cornflakes instead of heating on the stove?
Hi Yvonne! I am so glad you had these ingredients are loving this recipe. You can totally add these ingredients to the microwave and then add the cornflakes, no problem. Hope you enjoy! Thanks for your review + star rating, I appreciate it!
YUM! I found generic bran flakes at local grocery store and these turned out absolutely delicious! Super easy, super fast. The dough is very easy to work with so rather than pressing into individual molds next time, I might just roll into balls and dip half in chocolate. Thank you for the inspiration!!!
Excellent! I am so glad this recipe turned out great for you, Tammy! Thank you for sharing your review & star rating, I so appreciate it!
These sound amazing. BUT, if they taste as good as they sound and look, how can they possibly last 1-2 months in the freezer????!!!!
haha, I feel you! They never last that long over here!