Easy Cottage Cheese Bagels
This post may include affiliate links. Thank you for your support.
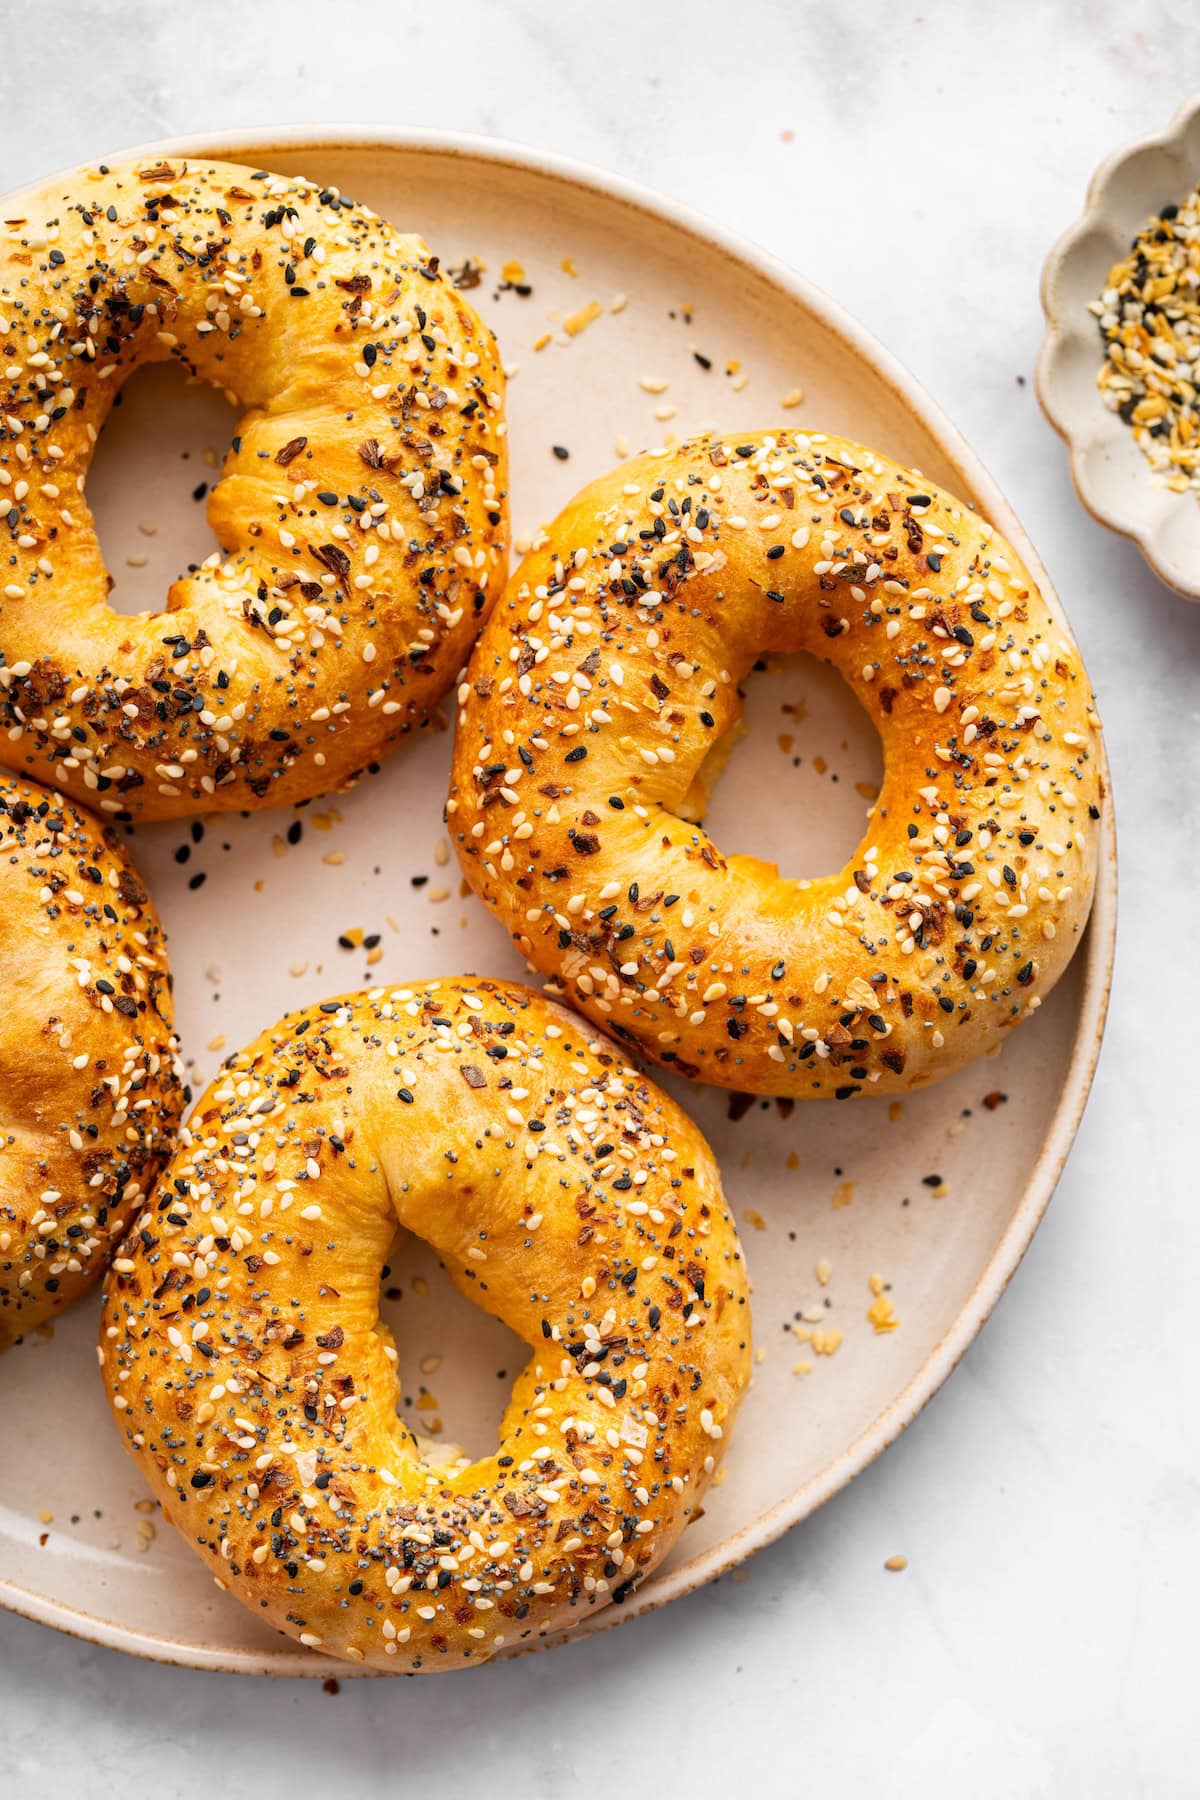
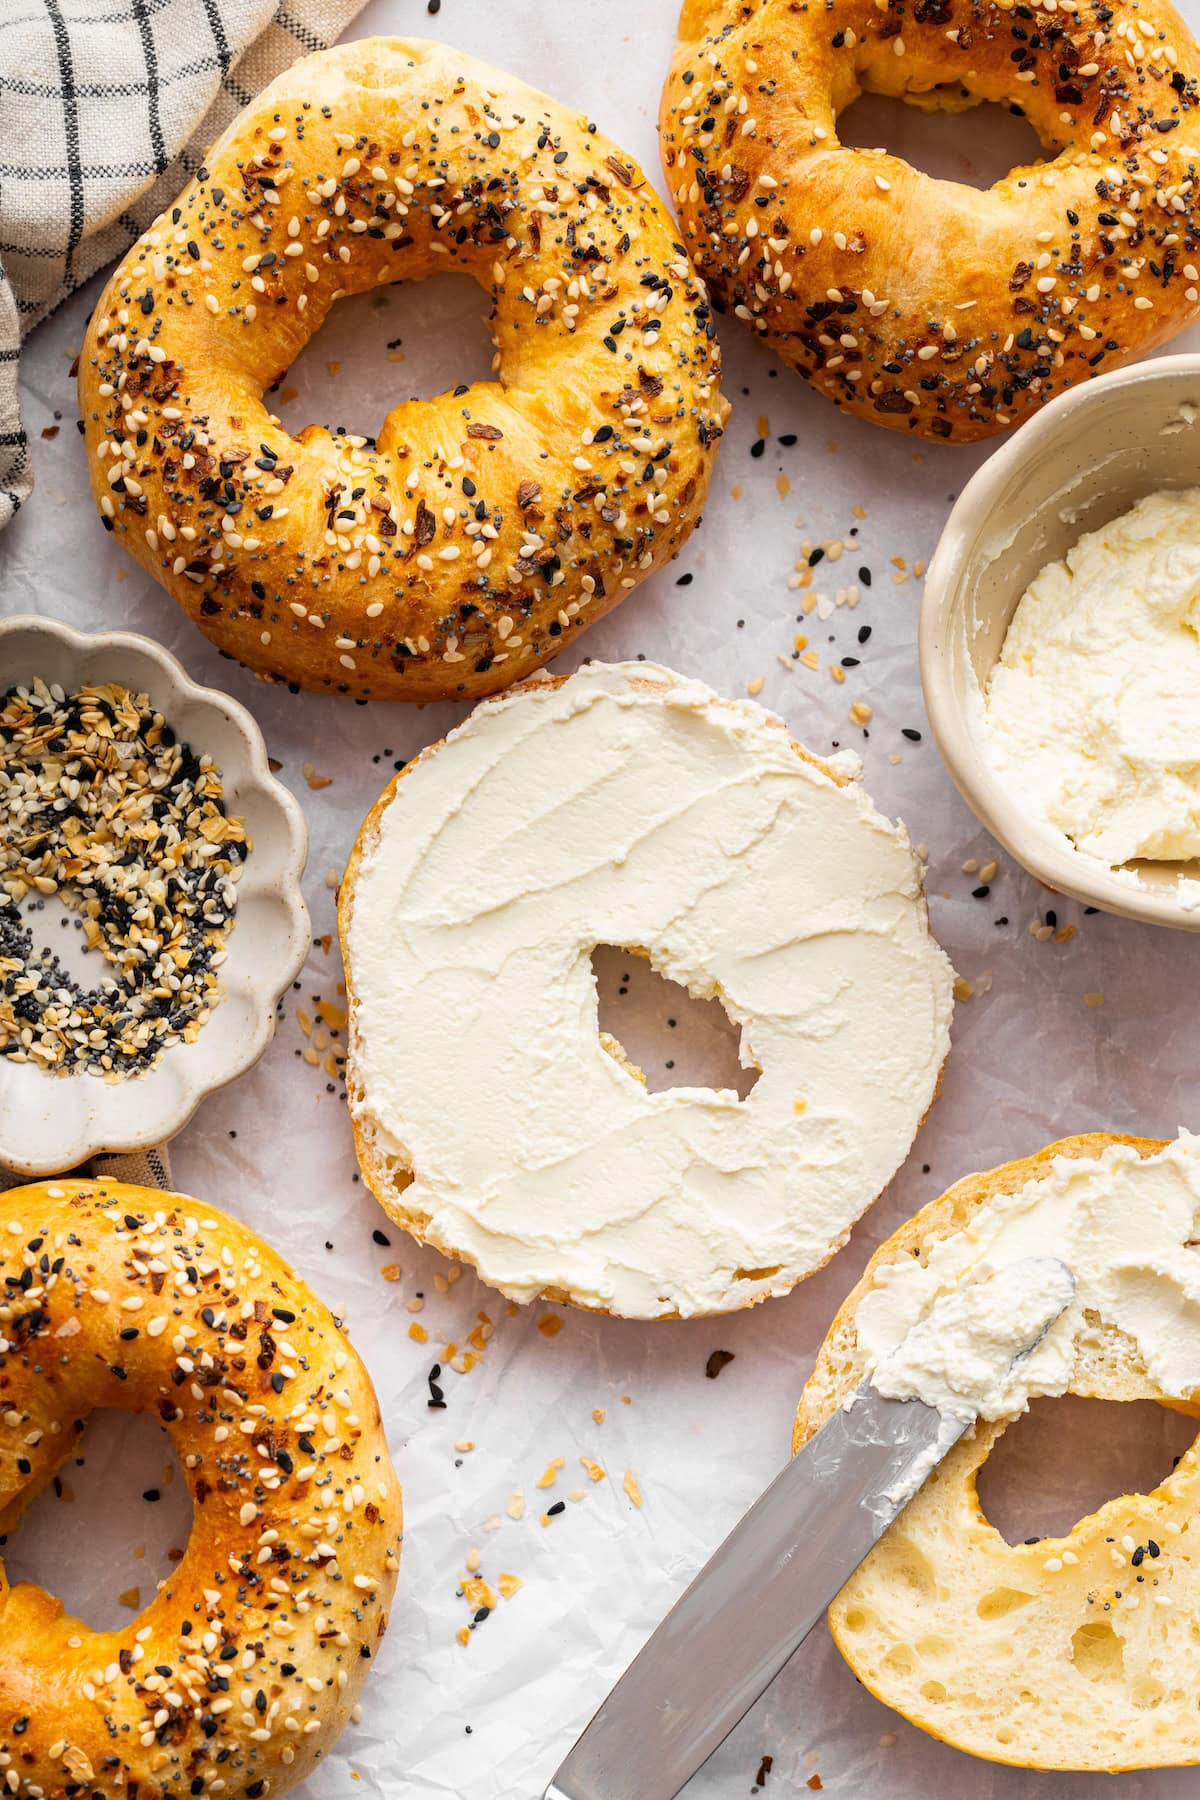
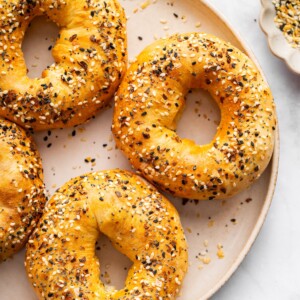
You only need 4 ingredients to make these cottage cheese bagels with 13g of protein each. No yeast needed and they turn perfectly soft and chewy.
My mother-in-law, Ellen, is actually the inspiration behind these cottage cheese bagels. She started making these awhile ago and once I tried them, I knew I needed to try making them and share the recipe with you. They’re so good and really do taste like a regular bagel to me, but with much better macros.
The best part is that my MIL tested this recipe so many times – making them in the air-fryer, oven and even trying them with gluten-free flour so I have all those details for you!
As you may or may not know, I already have a protein bagel recipe made with Greek yogurt, but I have to say… I might love this cottage cheese version even more. These are just as easy to make and have a bit more protein.
If you’re looking for a high-protein breakfast that feels a little more fun than your usual routine, these bagels are it.
Table of Contents
Why You’ll Love These Cottage Cheese Bagels

- High in protein: Each bagel packs 13g of protein, making them a super satisfying breakfast or snack.
- Just 4 main ingredients: No complicated steps or hard-to-find ingredients here. You probably have everything you need already.
- No yeast required: No rising, no waiting… just mix, shape and bake.
- Soft and chewy texture: These come out perfectly tender on the inside with a lightly golden exterior.
- Easy to customize: Top with everything seasoning, sesame seeds, poppy seeds or keep them plain.
Ingredients Needed
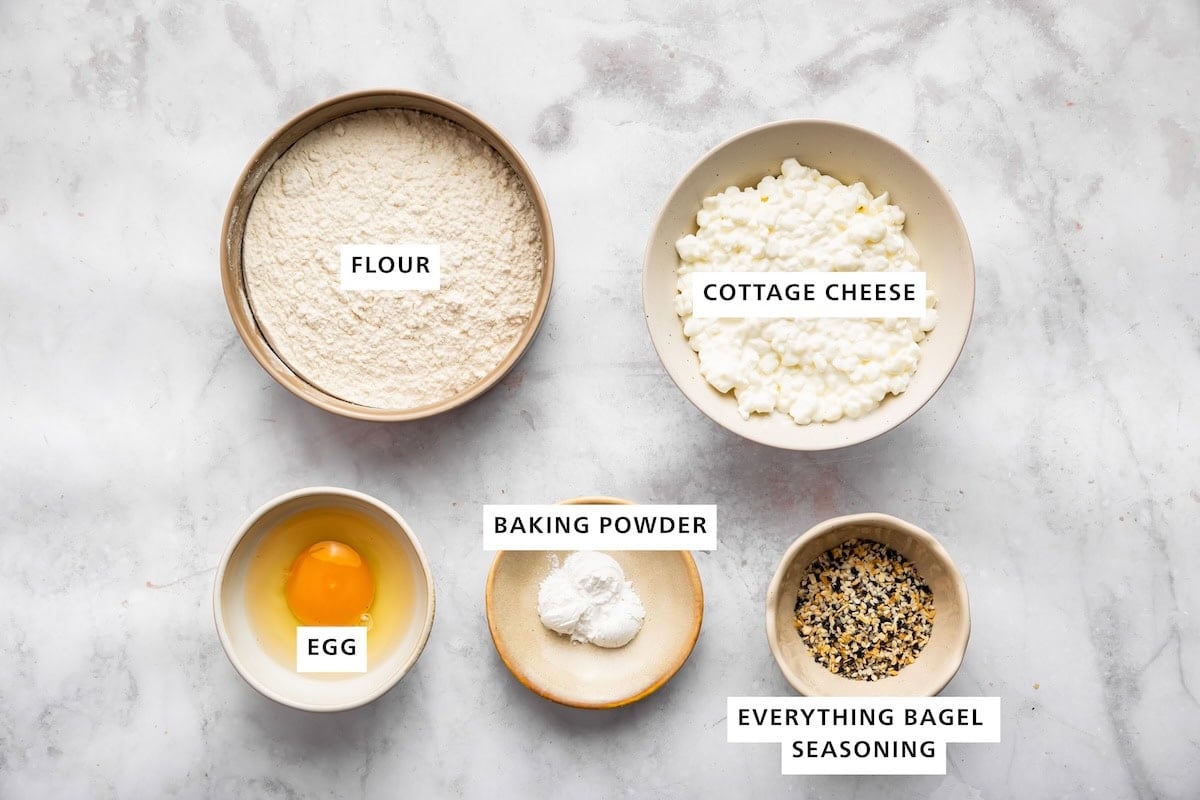
- cottage cheese – the star of the show! It adds moisture and boosts the protein. I like using full-fat for the best texture, but low-fat works too. Just note the bagels may be slightly more soft or “wet” inside when baked if you use low-fat cottage cheese, but they firm up nicely once toasted.
- flour – you can use all-purpose flour or whole wheat flour for a heartier texture and flavor. We also tested this with Bob’s Red Mill gluten-free all-purpose flour and it works great too!
- baking powder – helps the bagels rise and keeps them light without needing yeast.
- egg – used for brushing the tops to give the bagels that golden, bakery-style finish.
- everything bagel seasoning – this is optional, but I love topping my bagels with everything bagel seasoning for that classic savory flavor. Feel free to use sesame seeds, poppy seeds or your favorite topping instead.
How to Make Cottage Cheese Bagels
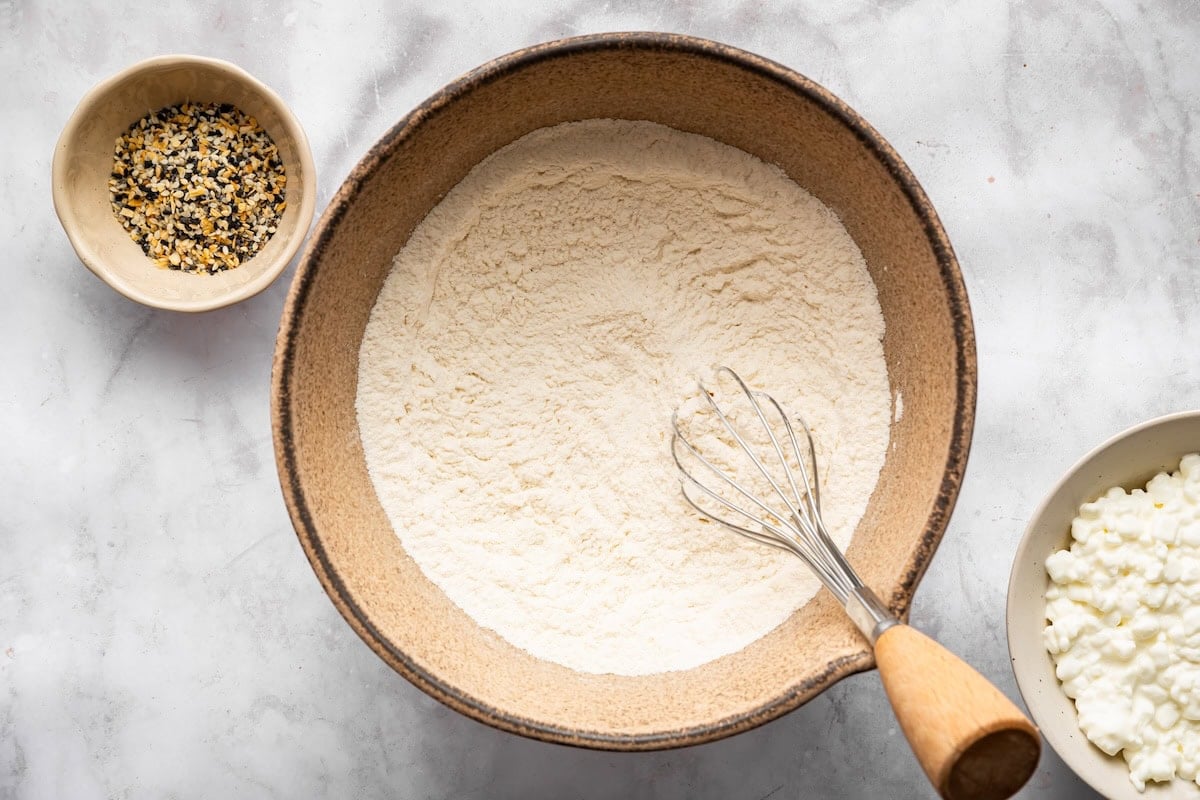
Step 1: In a medium bowl, whisk together the flour and baking powder until well combined.
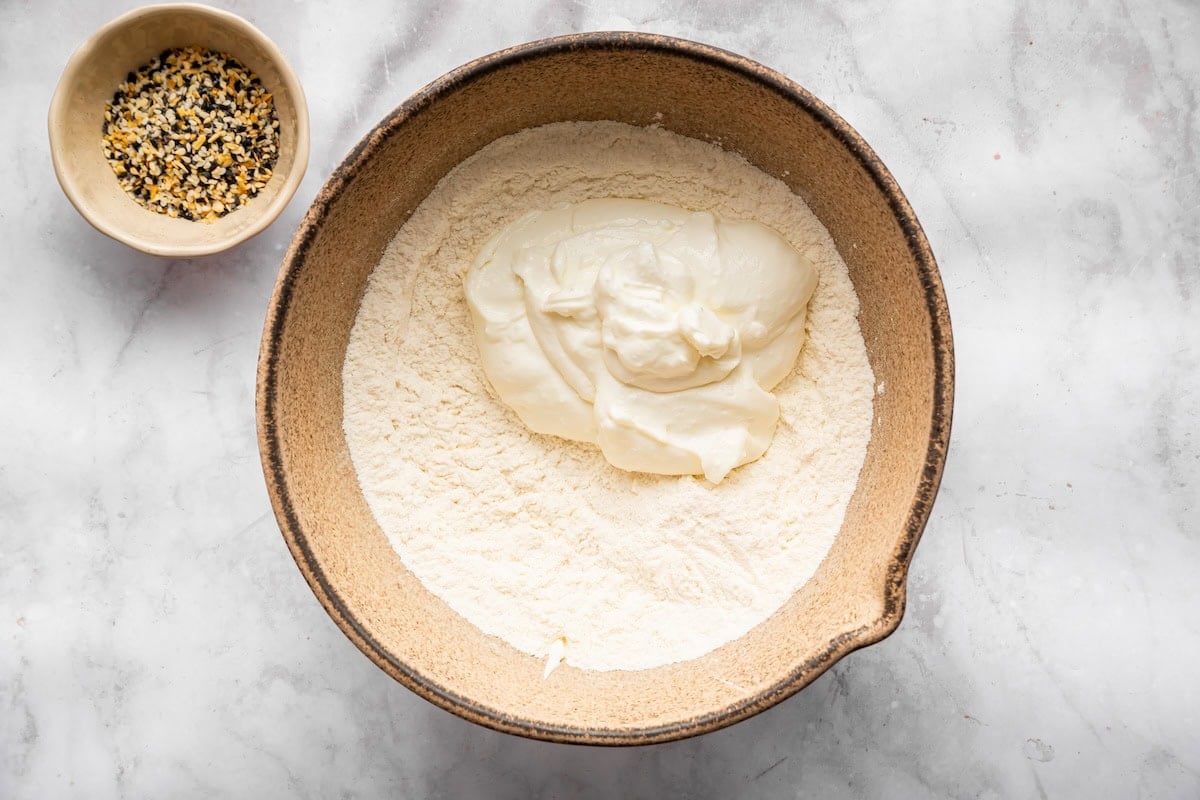
Step 2: Add the blended cottage cheese to the flour mixture and stir until a shaggy dough forms.
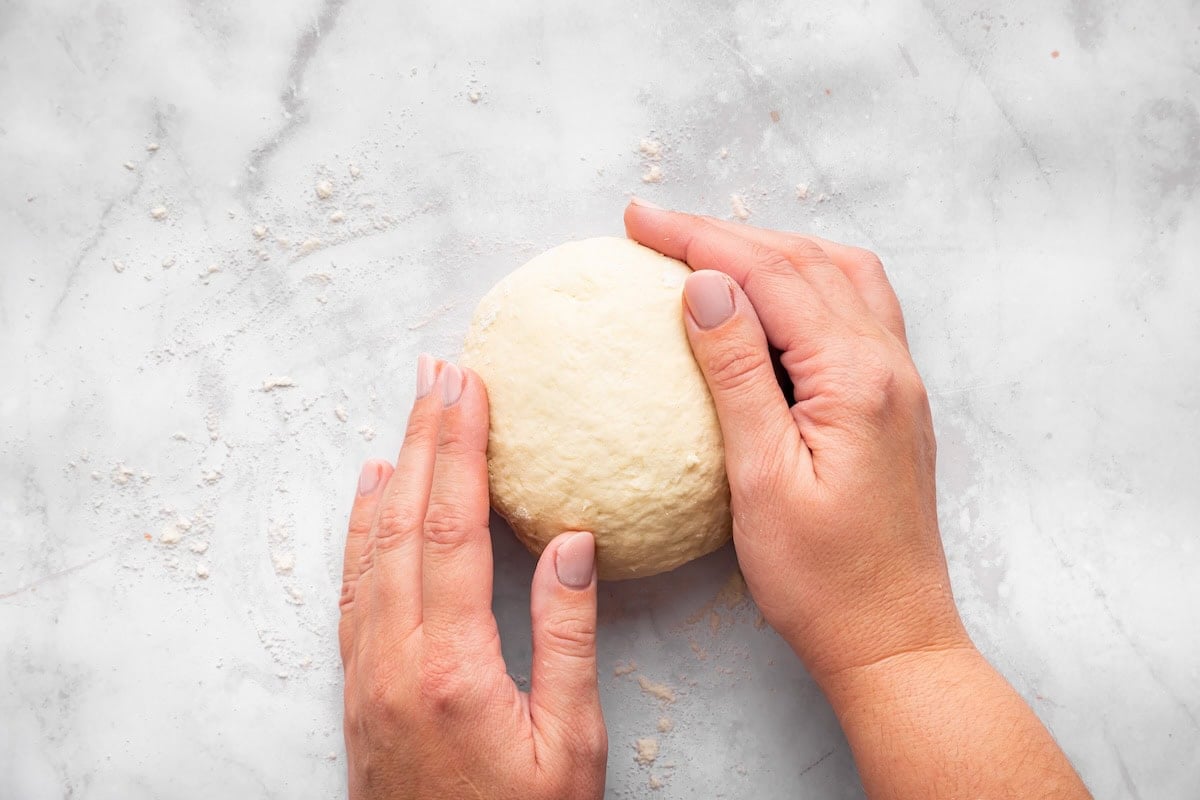
Step 3: Transfer to a lightly floured surface and knead for about 1–2 minutes, until smooth and cohesive. The dough should feel soft but not overly sticky.
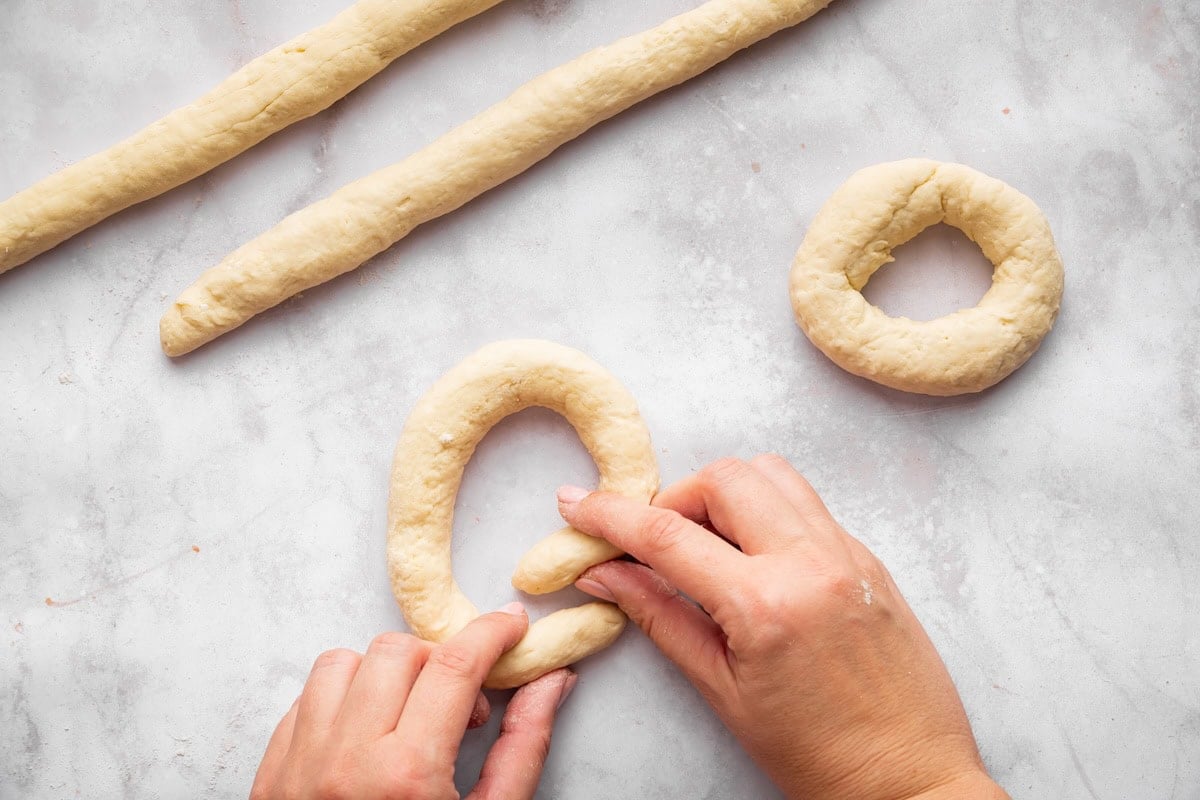
Step 4: Divide the dough into 4 equal pieces. Roll each piece into a rope and connect the ends to form a bagel shape. Make the center hole slightly larger than you think.
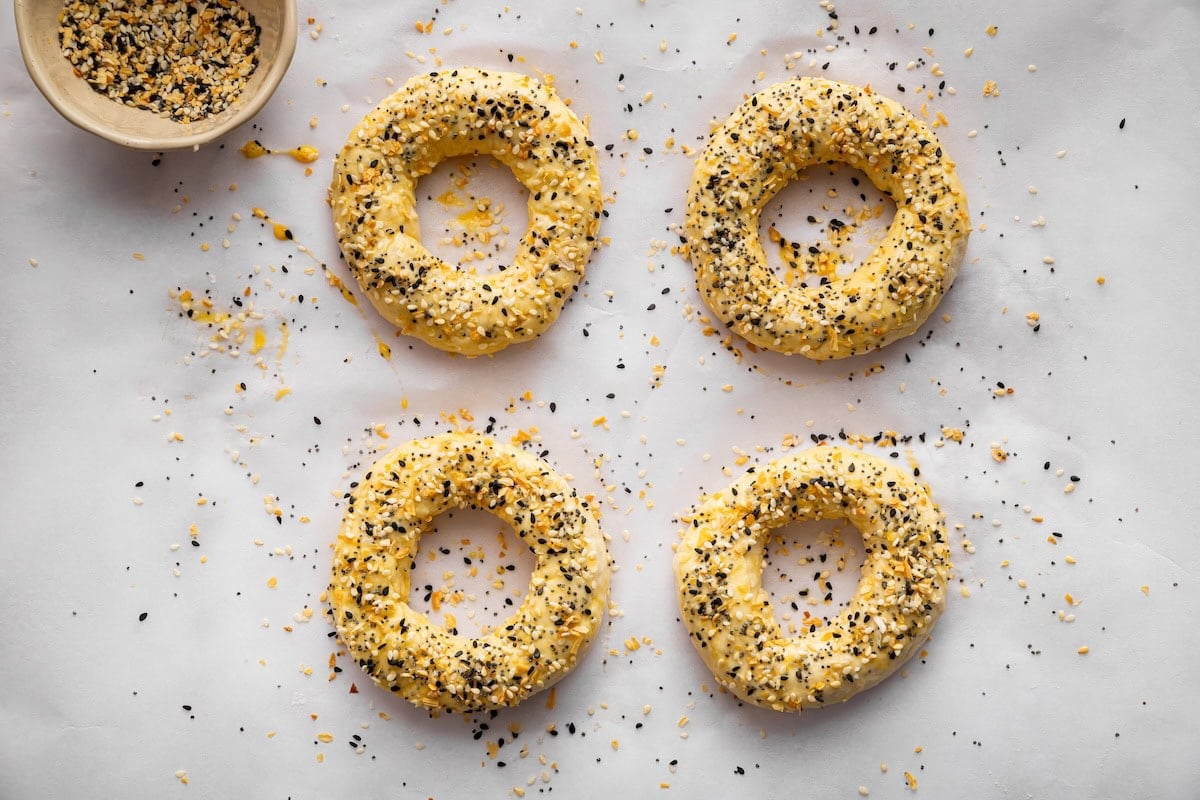
Step 5: Place the bagels on a lined surface, brush the tops with egg wash and sprinkle with everything bagel seasoning or your favorite toppings.
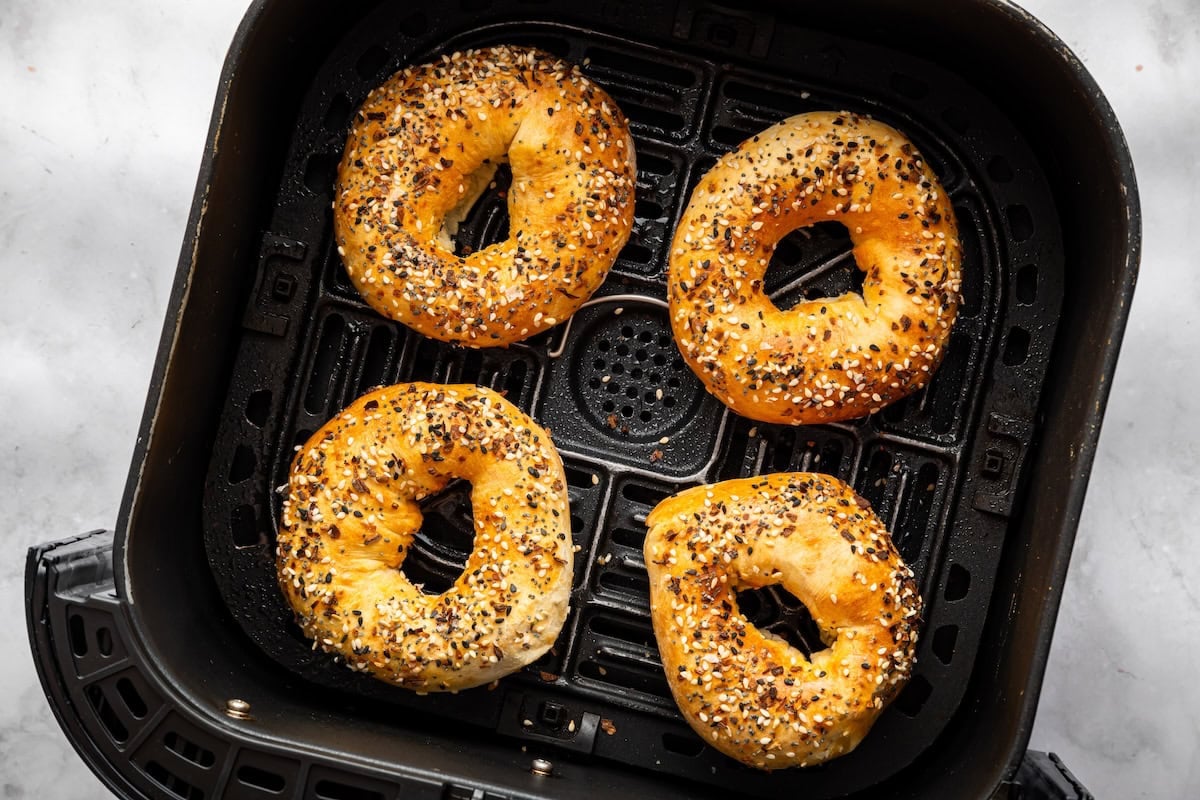
Step 6: Place the bagels in the air fryer in a single layer and cook at 325°F for about 15 minutes, or at 375°F for about 25 minutes in the oven, or until golden brown and cooked through. Let them cool for at least 10–15 minutes before slicing so the centers set properly.
Brittany’s Recipe Tips
- Let bagels cool before slicing: This is so important! Whether you make these in the air fryer or oven, let the bagels cool for at least 15 minutes before cutting. If you slice too soon, the inside can be gummy.
- Make the hole bigger than you think: The dough will puff up as it cooks, so don’t be shy here. A larger hole helps keep that classic bagel shape instead of closing up completely.
- Don’t overwork the dough: Knead just until it comes together. Over-mixing can make the bagels too dense.
- Add flour if the dough is sticky: Depending on your cottage cheese and flour, the dough can vary slightly. If it’s too sticky to handle, sprinkle in a little extra flour until it’s manageable.
How to Store, Reheat & Freeze
- Storing: Let the bagels cool completely, then store them in an airtight container in the fridge for up to 4–5 days. I like to keep them pre-sliced so they’re ready to grab and toast.
- Reheating: These bagels are best enjoyed toasted!
- Toaster (recommended): Slice and toast until warm and lightly crisp on the outside.
- Air fryer: Heat at 325°F for 3–5 minutes until warmed through.
- Microwave: Warm for 20–30 seconds, but note they’ll be softer (less crisp).
- Freezing: These bagels freeze really well! Let them cool completely, then slice in half. Store in a freezer-safe bag or container for up to 2–3 months. To reheat, pop them straight from the freezer into the toaster or air fryer until warmed through.

Frequently Asked Questions
Yes! Low-fat cottage cheese works just fine. The bagels may be slightly more soft or “wet” inside after baking, but they firm up nicely once toasted.
I highly recommend it. Blending creates a smooth dough and better texture. If you skip this step, the bagels will taste fine but the dough can be a bit lumpy.
Yes! If you don’t have an air fryer, bake the bagels in the oven at 375°F for about 25 minutes, or until golden brown and cooked through.
Yes! We’ve tested this recipe with Bob’s Red Mill gluten-free all-purpose flour and it works great.
This usually happens if you cut into them too soon. Be sure to let the bagels cool for at least 15 minutes before slicing so the centers can fully set.
More Cottage Cheese Recipes

If you enjoyed this recipe, please consider leaving a ⭐ star rating and let me know how it went in the 📝 comments below.
Cottage Cheese Bagels
Ingredients
- 1 cup full fat Good Culture Cottage Cheese
- 1 cup all-purpose flour, whole wheat flour or gluten-free all-purpose flour
- 1 ½ teaspoon baking powder
- 1 egg, whisked
- Everything Bagel Seasoning, to taste
Instructions
- Add the cottage cheese to a blender or food processor and blend until completely smooth and creamy. This step is key for a smooth dough.
- In a medium bowl, whisk together the flour and baking powder until evenly combined.
- Add the blended cottage cheese to the flour mixture and stir until a shaggy dough forms. Transfer the dough to a lightly floured surface and knead for 1–2 minutes, just until smooth and cohesive. It should feel soft but not overly sticky. If needed, add a light dusting of flour.
- Divide the dough into 4 equal pieces. Roll each piece into a rope, then connect the ends to form a bagel shape. Make the center hole slightly larger than you think it should be, since it will shrink as it bakes.
- Brush the tops with egg wash, then sprinkle with your favorite seasonings. Everything seasoning, sesame seeds or poppy seeds are all great options.
Cook in the air fryer
- Place the bagels in the air fryer basket in a single layer. Air fry at 325°F for about 15 minutes, or until golden brown and cooked through.
- Let the bagels cool for at least 15 minutes before slicing. Cutting too soon can make them seem doughy inside. Once cooled, toast and enjoy!
Cook in the oven
- Place the bagels on a parchment-lined baking sheet and bake at 375°F for about 25 minutes, or until golden brown and cooked through.
- Let the bagels cool for at least 15 minutes before slicing. Cutting too soon can make them seem doughy inside. Once cooled, toast and enjoy!
Notes
- Flour options: Whole wheat flour is my favorite for flavor and texture, but all-purpose flour works great too. I’ve also tested this with Bob’s Red Mill gluten-free all-purpose flour with good results.
- Using low-fat cottage cheese: This works, but the bagels may be slightly more soft inside after baking. Toasting helps firm them up.
- Adjust dough as needed: If your dough feels too sticky, add a little extra flour. If it feels too dry, mix in a small spoonful of cottage cheese.
- Storage: Store bagels in an airtight container in the fridge for up to 4–5 days or freeze for longer storage. Slice before freezing for easy reheating.
Nutrition
Nutrition information is automatically calculated, so should only be used as an approximation.
Like This Recipe? Rate & Comment Below!